 In the following Power Button vector tutorial, you will learn how to create a simple power button in Adobe Illustrator. In the beginning you will learn how to set up a simple grid and how to create and center a simple rectangle that will make up your background. Next, using basic vector shape building techniques you will learn how to create the circle and the compound path that will make up your power button. Finally, taking full advantage of the Appearance panel, you will learn how to add color, shading, highlights and depth for your shapes.
Tutorial Details: Power Button Vector
- Program: Adobe Illustrator CS5
- Difficulty: Beginner-Intermediate
- Topics Covered: Basic Tools & Effects and the Appearance panel
- Estimated Completion Time: 45 minutes
Final Image: Power Button Vector
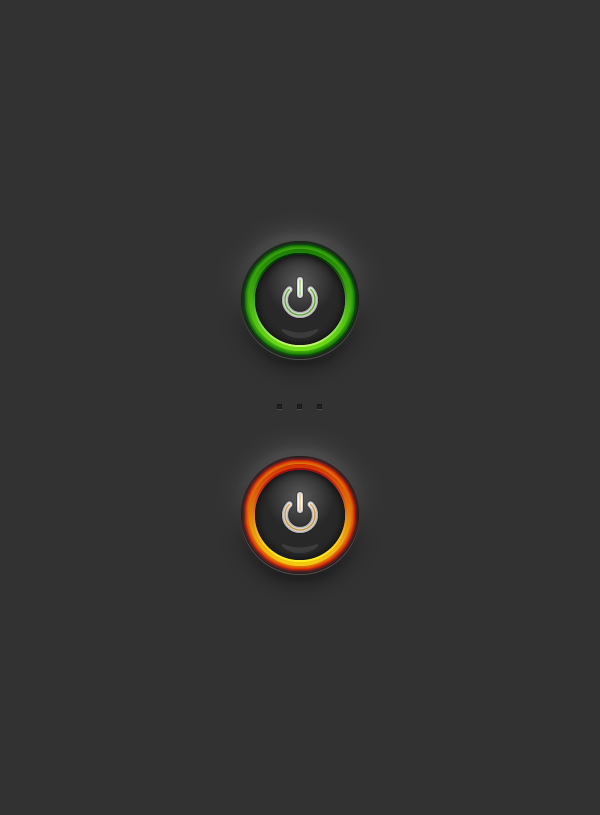
As always, this is the final power button vector image that we’ll be creating:
Step 1
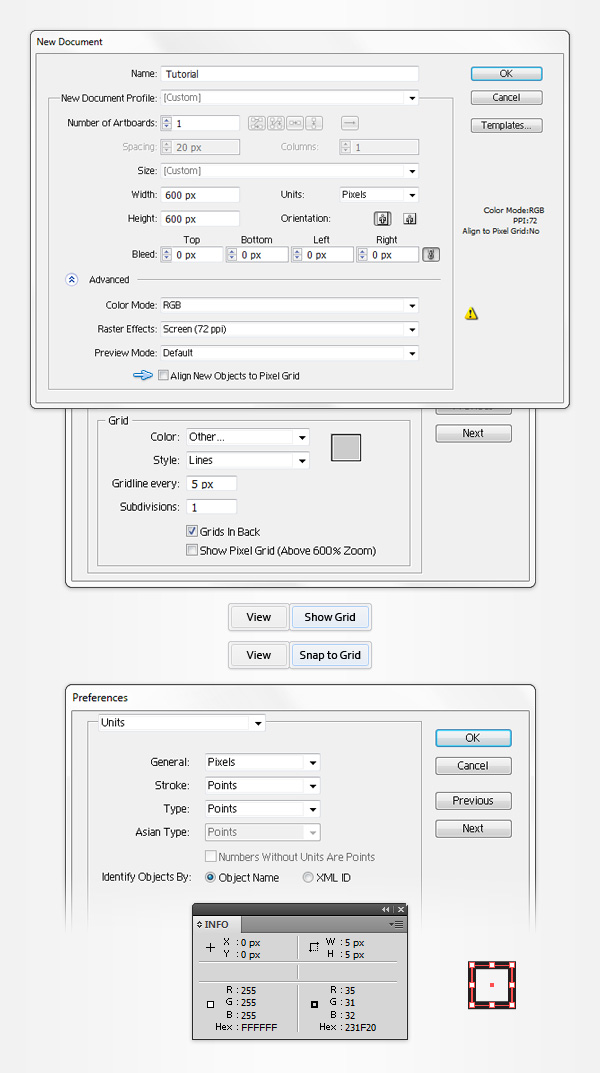
To begin our power button vector tutorial, hit Command + N to create a new document. Select Pixels from the Units drop-down menu, enter 600 in the Width and Height boxes then click on the Advanced button. Select RGB, Screen (72ppi) and make sure that the Align New Objects to Pixel Grid box is unchecked before you click OK. Enable the Grid (View > Show Grid) and the Snap to Grid (View > Snap to Grid). You will need a grid every 5px, so simply go to Edit > Preferences > Guides > Grid, enter 5 in the Gridline every box and 1 in the Subdivisions box. You should also open the Info panel (Window > Info) for a live preview with the size and position of your shapes. Do not forget to set the unit of measurement to pixels from Edit > Preferences > Units > General. All these options will significantly increase your work speed.
Step 2
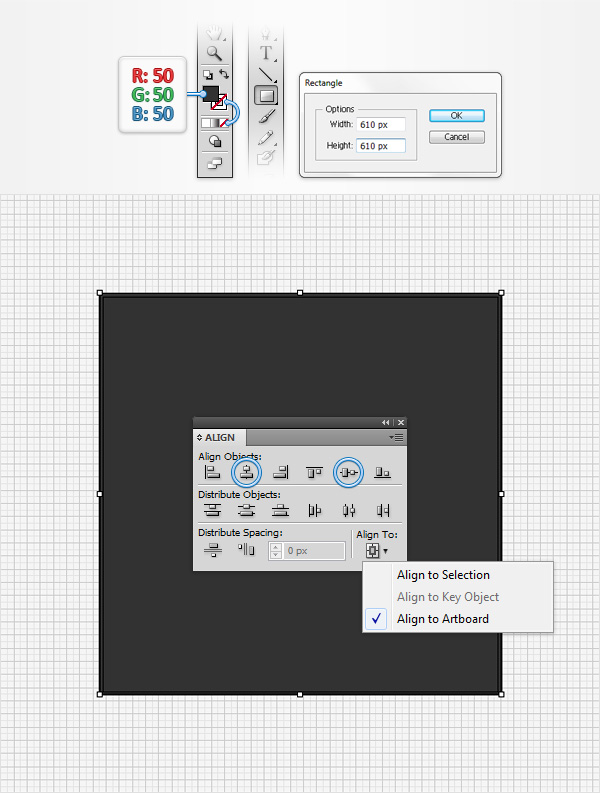
Pick the Rectangle Tool (M) and focus on your Toolbar. Remove the color from the stroke then select the fill and set its color at R=50 G=50 B=50. Now, simply click on your artboard to open the Rectangle window. Enter 610 in the Width and Height boxes then click the OK button. This should create a 610px square. Next, you will need to center it, so open the Align panel (Window > Align). Set the aligning to artboard (open the fly out menu and go to Show Options if you can’t see the Align To section as shown in the following image), then simply click the Horizontal Align Center and Vertical Align Center buttons. In the end, your dark shape should cover the entire artboard as shown in the following image.
Step 3
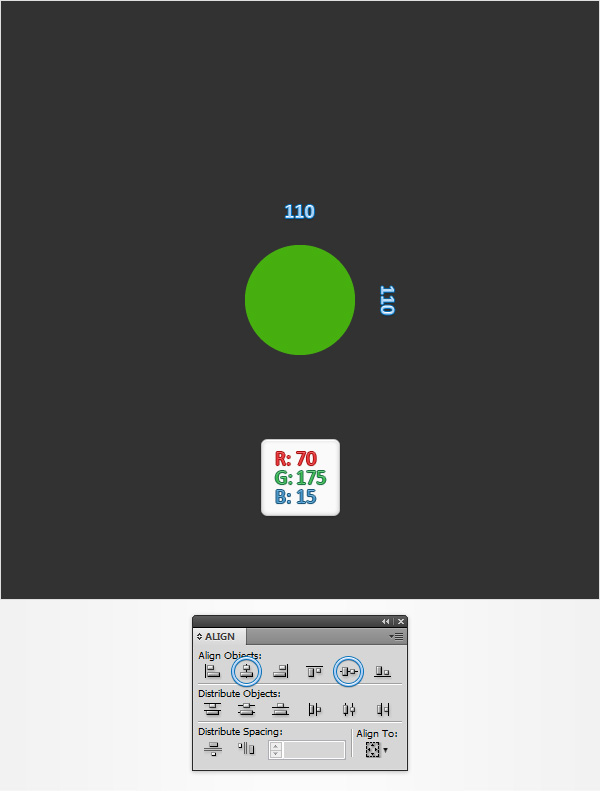
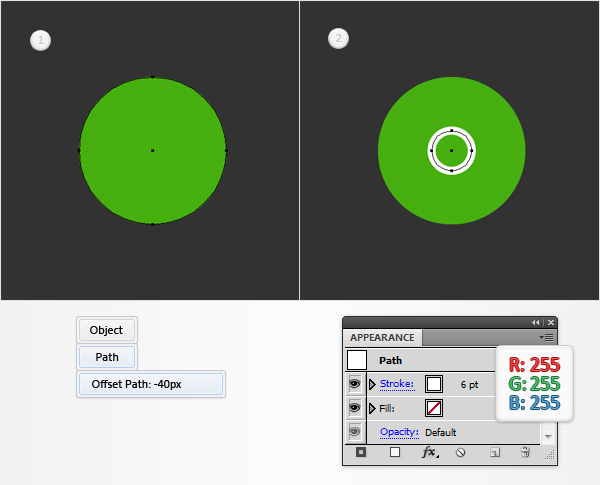
Return to your Toolbar, set the fill color at R=70 G=175 B=15 and switch to the Ellipse Tool (L). Create a 110px circle and center it using the Horizontal Align Center and Vertical Align Center buttons from the Align panel.
Step 4
Make sure that your green circle is selected and your power button vector is off to a great start, go to Object > Path > Offset Path. Enter a -40px Offset and click OK. Select the resulting shape and focus on the Appearance panel (Window > Appearance). Remove the color from the fill, select the stroke, set the color at white and increase the weight to 6pt.
Step 5
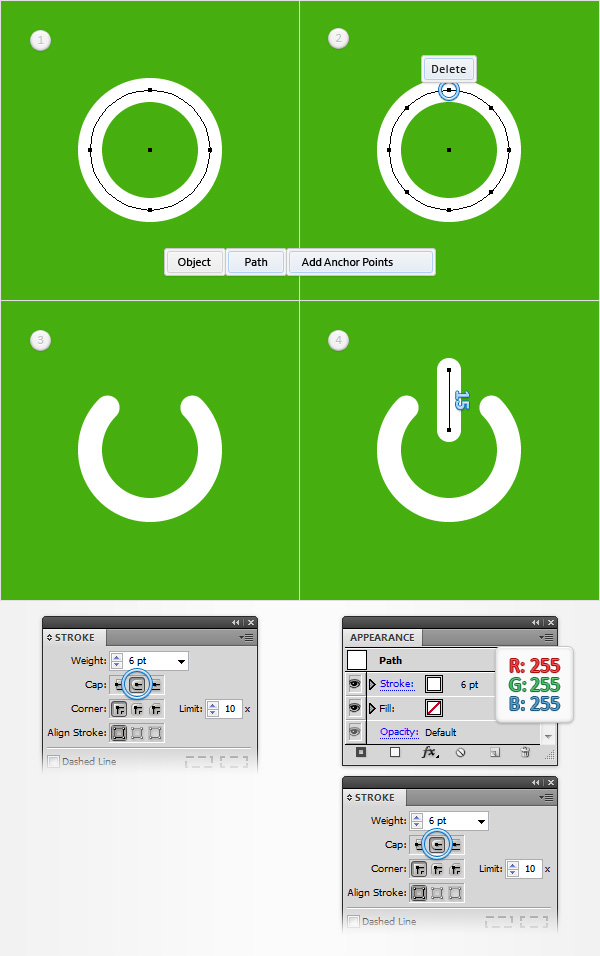
Select the circle with the white stroke and go to Object > Path > Add Anchor Points. Keep focusing on this shape, grab the Direct Selection Tool (A), select the top anchor point (highlighted in the second image) and simply hit the Delete key from your keyboard to remove it. Make sure that the remaining path stays selected, open the Stroke panel (Window > Stroke) and simply check the Round Cap button. In the end, things should look like in the third image. Pick the Pen Tool (P), create a 15px, vertical path and place it as shown in the fourth image. Add a white, 6pt stroke for this new path, select it and check the Round Cap button from the Stroke panel.
Step 6
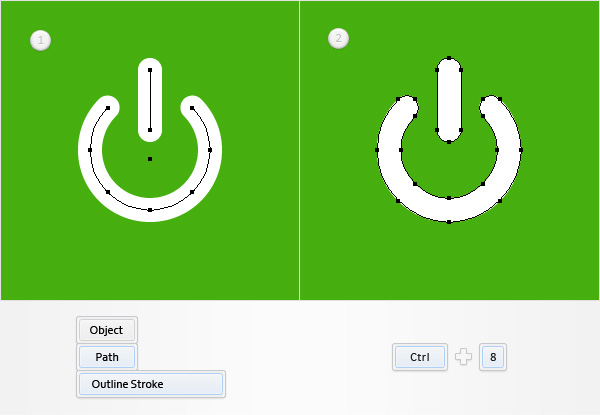
Make sure that both, white paths are selected and go to Object > Path > Outline Stroke. Select the resulting shapes and hit CTRL + 8 (or go to Object > Compound Path > Make) to turn them into a simple compound path.
Step 7
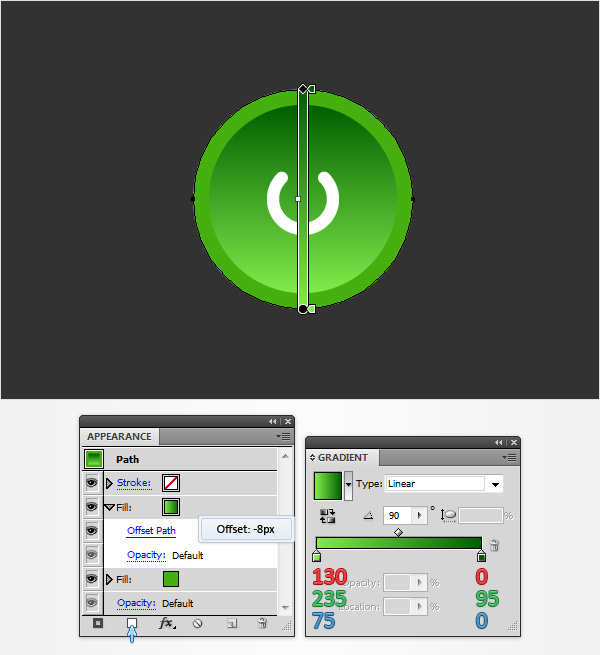
Make sure that your green circle stays selected, focus on the Appearance panel and add a second fill using the Add New Fill button (pointed by the little, blue arrow in the following image). Select this new fill, open the Gradient panel (Window > Gradient) and simply click on the gradient thumbnail to add the default black to white linear gradient. Keep focusing on your Gradient panel, set the angle at 90 degrees then move to the gradient colors. Select the right slider and set the color at R=0 G=95 B=0 then select the left slider and set the color at R=130 G=225 B=75. Make sure that this second fill is still selected and go to Effect > Path > Offset Path. Enter -8px Offset and click OK.
Step 8
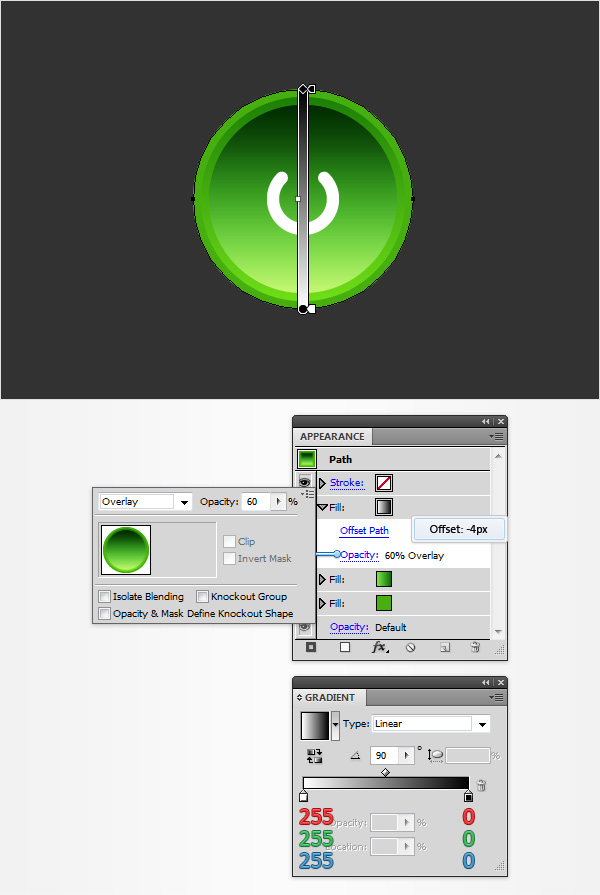
Make sure that your green circle stays selected, focus on the Appearance panel and add a third fill using that same Add New Fill button. Select this new fill, add the white to black linear gradient and set its angle at 90 degrees. Keep focusing on the Appearance panel and click on the little arrow icon that stands for your top fill. Simply click on that Opacity piece of text to open a fly-out Transparency panel. Change the Blending Mode to Overlay and lower the Opacity to 60% then go to Effect > Path > Offset Path. Enter a -4px Offset and click OK.
Step 9
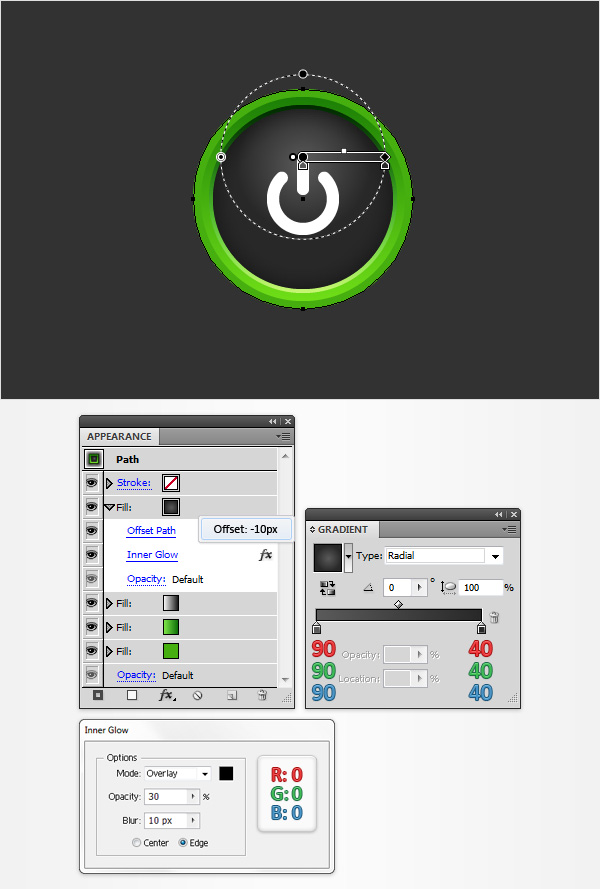
Make sure that your green circle stays selected, focus on the Appearance panel and add a fourth fill. Select it and add the radial gradient shown below. Make sure that this new fill stays selected, grab the Gradient Tool (G), focus on your Artboard, stretch that gradient roughly as shown in the following image and then go to Effect > Path > Offset Path. Enter a -10px Offset, click OK and go to Effect > Stylize > Inner Glow. Enter the properties shown in the following image and click OK.
Step 10
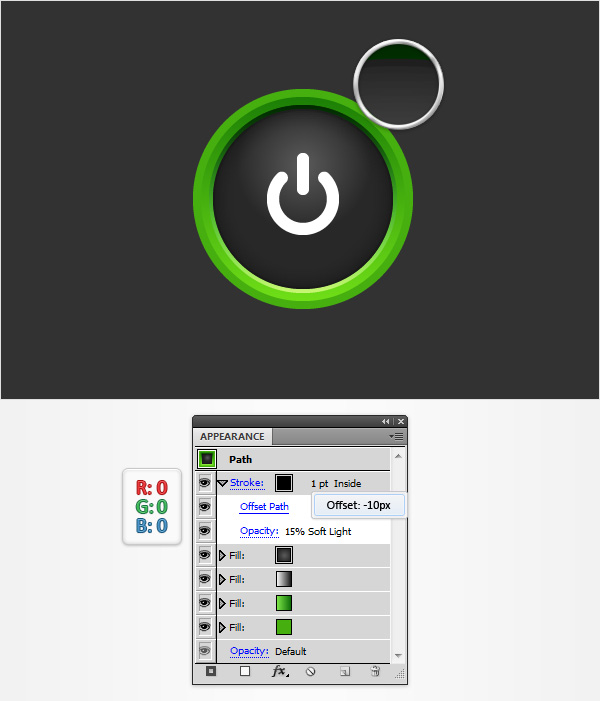
Make sure that your green power button vector circle stays selected, focus on the Appearance panel, select the existing stroke and set its color at black. Move to the Stroke panel, make sure that the weight is set at 1pt then simply check the Align Stroke to Inside button. Return to the Appearance panel, keep focusing on this black stroke, lower its Opacity to 15%, change the Blending Mode to Soft Light and go to Effect > Path > Offset Path. Enter a -10px Offset and click OK.
Step 11
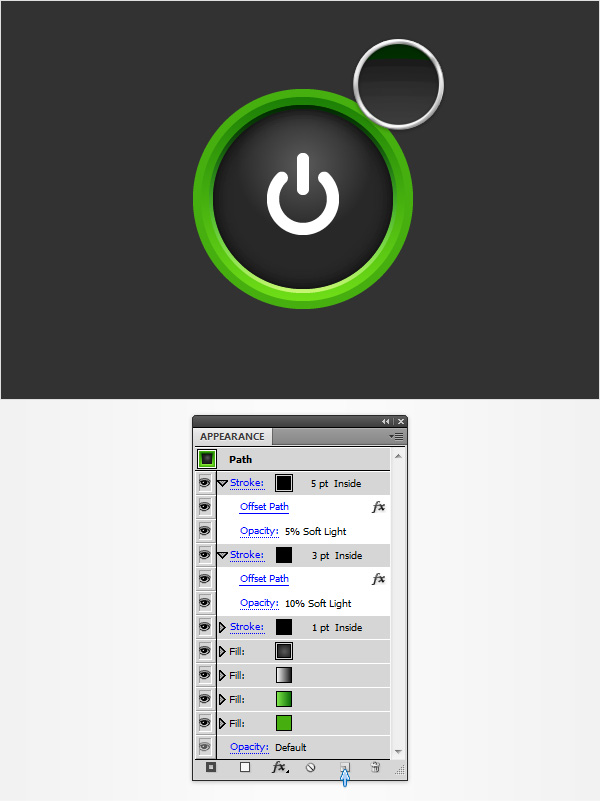
Make sure that your green circle stays selected, focus on the Appearance panel, select the existing stroke and duplicate using the Duplicate Selected Item button (pointed by the little, blue arrow in the following image). Select this newly added stroke, increase the weight to 3pt and lower its Opacity to 10%. Make sure that this 3pt stroke is selected and duplicate it using that same Duplicate Selected Item button. Select this third stroke, increase the weight to 5pt and lower its Opacity to 5%.
Step 12
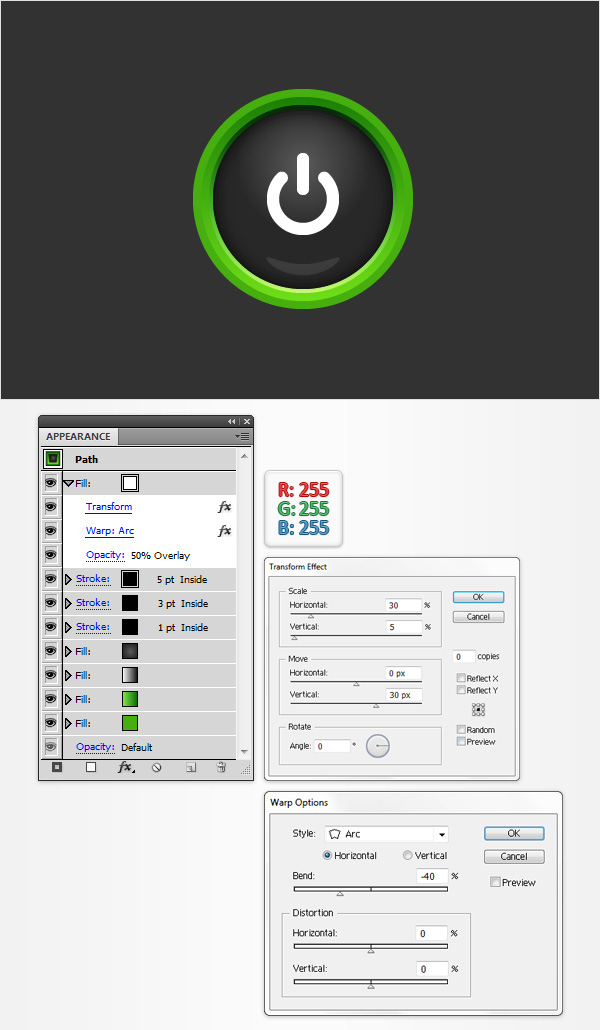
Make sure that your green circle stays selected and focus on the Appearance panel. Add a new fill, set its color at white and drag it in the top of the Appearance panel. Make sure that this new fill is selected, lower its Opacity to 50%, change the Blending Mode to Overlay and go to Effect > Distort & Transform > Transform. Enter the properties shown in the following image, click OK and go to Effect > Warp > Arc. Enter the attributes shown below and click OK.
Step 13
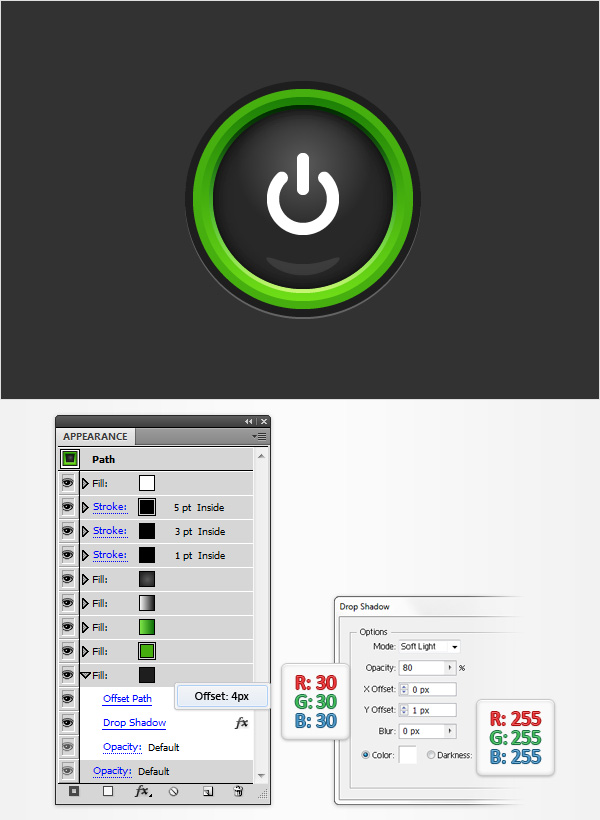
Make sure that your green circle stays selected and focus on the Appearance panel. Add a new fill, set its color at R=30 G=30 B=30 and drag it in the bottom of the Appearance panel. Make sure that this new fill is selected and go to Effect > Path > Offset Path. Enter a 4px Offset, click OK and go to Effect > Stylize > Drop Shadow. Enter the attributes shown below and click OK.
Step 14
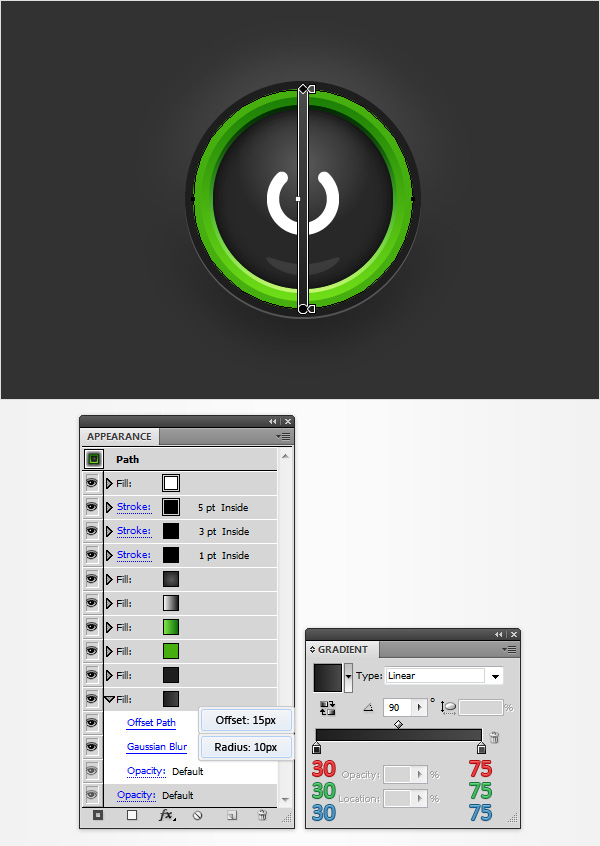
Make sure that your green circle stays selected and focus on the Appearance panel. Add a new fill, drag it in the bottom of the Appearance panel, add the linear gradient shown below and go to Effect > Path > Offset Path. Enter a 15px Offset, click OK and go to Effect > Blur > Gaussian Blur. Enter a 10px radius and click OK.
Step 15
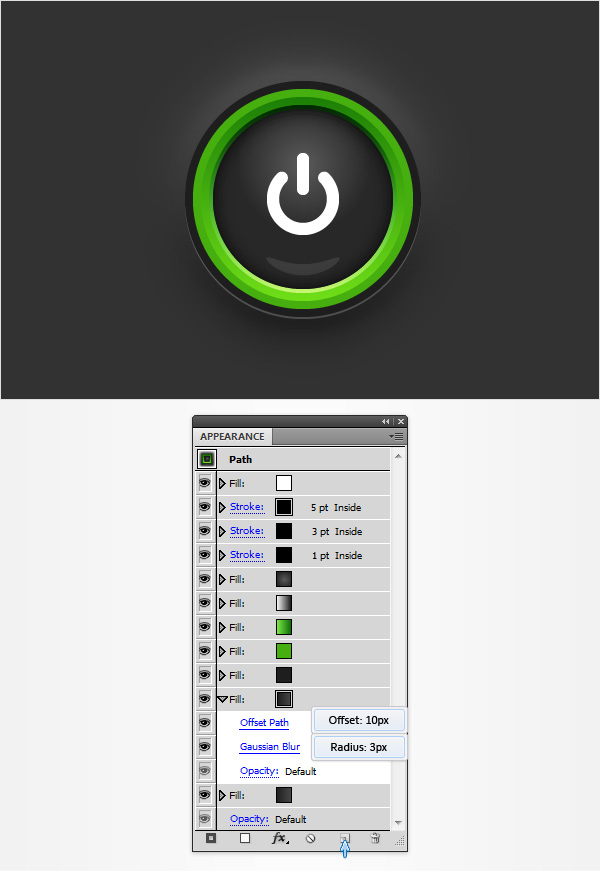
Make sure that your green circle stays selected and focus on the Appearance panel. Select the bottom fill and duplicate it using that same Duplicate Selected Item button from the bottom of your Appearance panel. Focus on this new fill, open the existing Offset Path effect, decrease the Offset to 10px then open the existing Gaussian Blur effect, decrease the radius to 3px and click OK.
Step 16
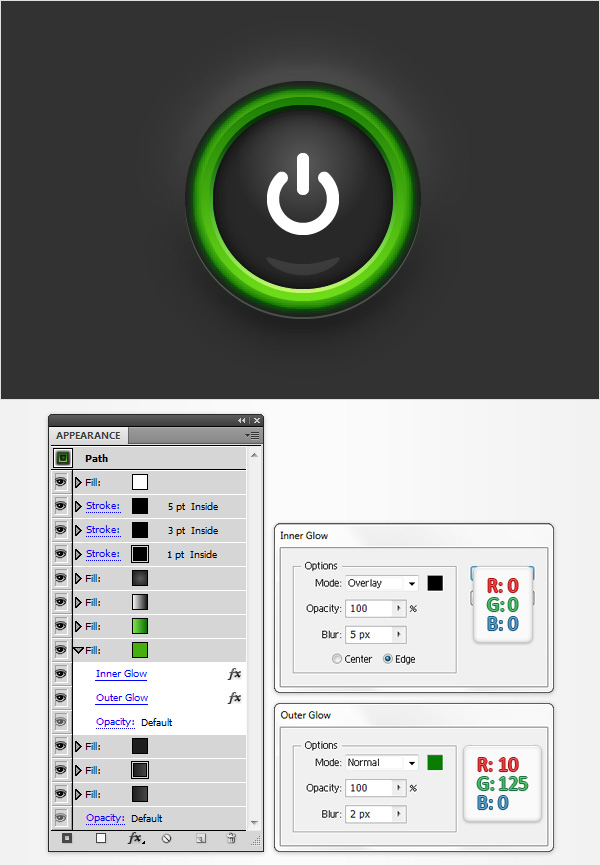
Make sure that your green circle stays selected and focus on the Appearance panel. Select that green (R=70 G=175 B=15) fill and go to Effect > Stylize > Inner Glow. Enter the properties shown in the following image, click OK and go to Effect > Stylize > Outer Glow. Enter the attributes shown below and click OK. In the end, things should look like in the following image.
Step 17
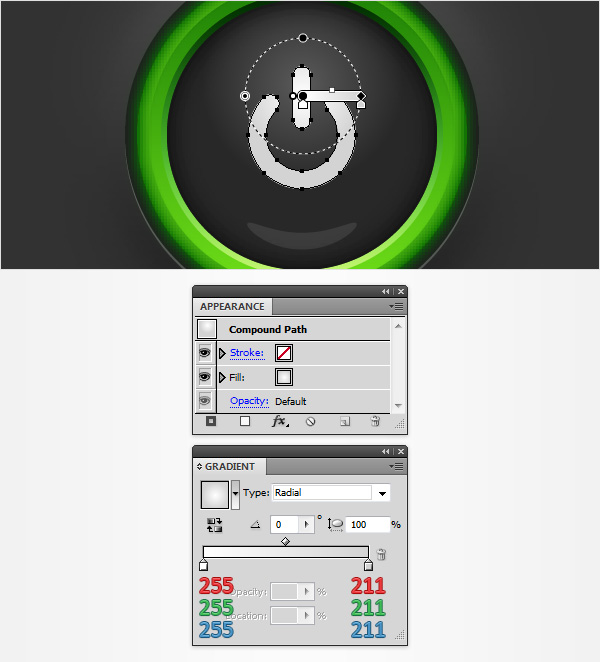
Make sure that your compound path stays selected and focus on the Appearance panel. Select the fill and replace the existing color with the radial gradient shown in the following image.
Step 18
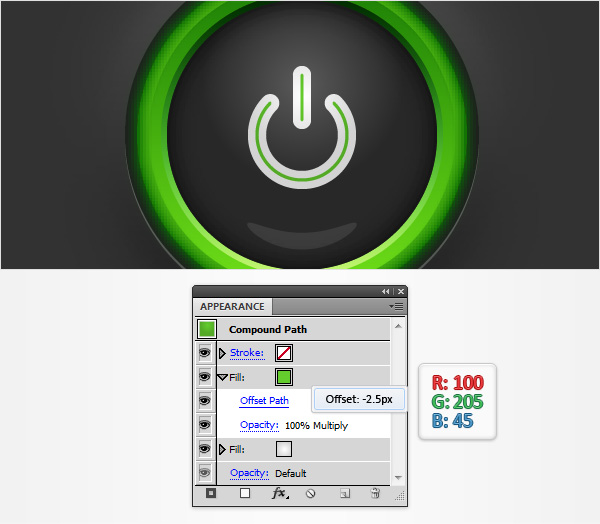
Make sure that your compound path stays selected, focus on the Appearance panel and add a second fill. Select it, set the color at R=100 G=205 B=45, change the Blending Mode to Multiply and go to Effect > Path > Offset Path. Enter a -2.5px Offset and click OK.
Step 19
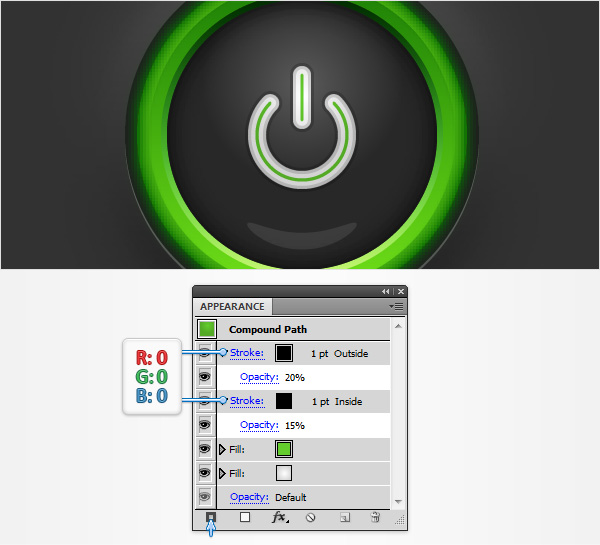
Make sure that your compound path stays selected and focus on the Appearance panel. Select the existing stroke, set the color at black, lower its Opacity to 15% and check the Align Stroke to Inside button from the Stroke panel. Return to the Appearance panel and add a second stroke for this shape using the Add New Stroke button (pointed by the little, blue arrow in the following image). Select this new stroke, lower its Opacity to 25% and check the Align Stroke to Outside button from the Stroke panel.
Step 20
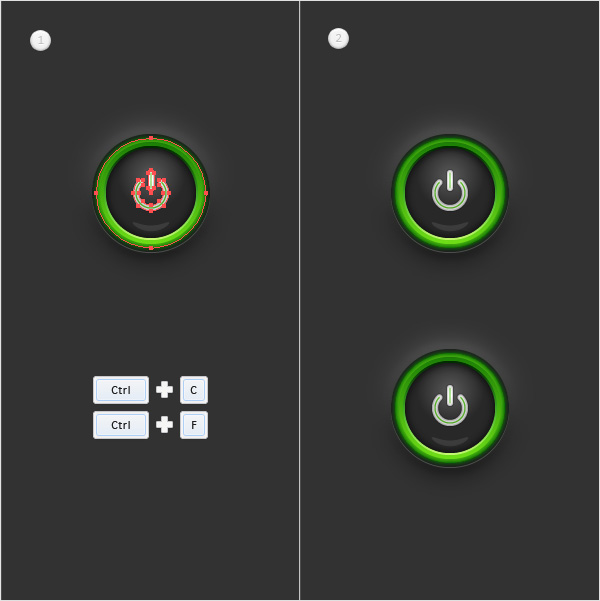
Reselect the circle and the compound path that make up your power button and duplicate them (CTRL + C > CTRL + F). Select these copies and simply drag them several pixels down as shown in the second image.
Step 21
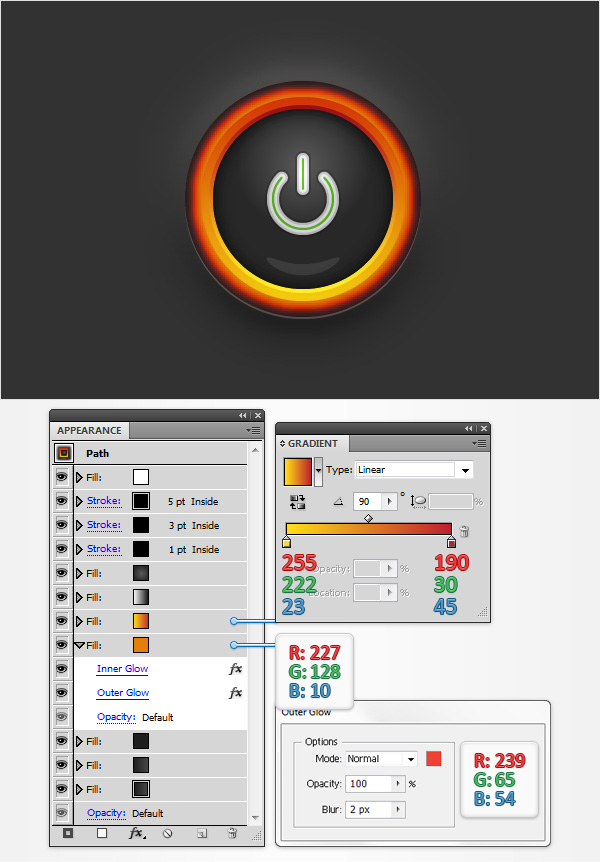
Select the circle that makes up your second button and focus on the Appearance panel. Select the fifth fill (start the count from the bottom) and simply replace the colors used for the existing linear gradient with the ones shown in the following image. Move down to the green fill and replace the existing color with R=227 G=128 B=10. Keep focusing on this orange fill, open the existing Outer Glow effect and enter the attributes shown in the following image.
Step 22
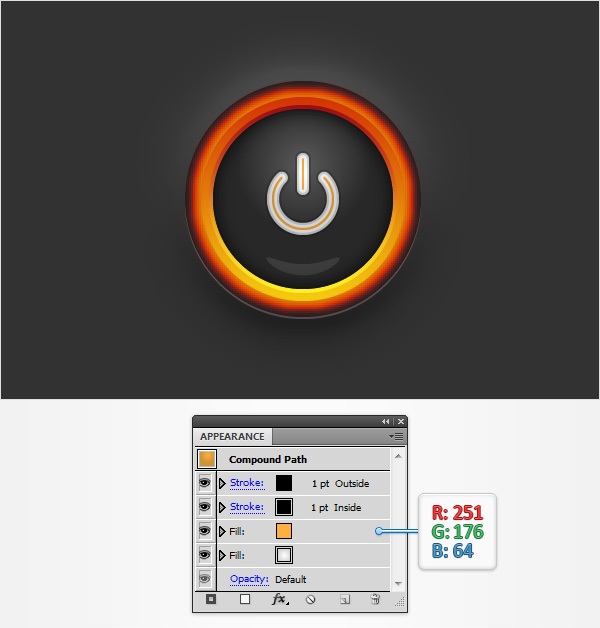
Select the compound path that makes up your second button and focus on the Appearance panel. Select the top fill and simply replace the green with R=251 G=176 B=64.
And We’re Done!
I hope you’ve enjoyed this power button vector tutorial and can apply these techniques in your future projects.


Im grateful for the blog article.Really thank you! Want more.
Thank you very very much. This tips helped me a lot!
I just started to use Illustrator from last October,
and made these buttons just now!
I just can’t believe this!
Hey guys.
Regarding the issue some of you have, I found a solution that is better than non 😛
What I mainly did was to add an Arch (not arc) and Shell upper which i modified like this:
Arch-> Bend: -57%
Shell upper-> Bend: -100 %
Transform was also adjusted accordingly:
Horizontal: 30% (same)
Vertical: 10%
Move-> Vertical: 3%
Feel free to adjust it if needed to get a better result.
When I complete the bigger offset gradients with gaussian blurs, i get a big dark circle around the outside instead of blending into the gray background. Any ideas?
Thanks for writing such an easaeto-und-rstynd article on this topic.
I’m having the same problem at Step 12. I’m running Illustrator CC (which I think it identifies now as v. 17) Latest download.
Following the steps as indicated results in a flattened oval that is down in the green section of the button, and not the crescent shape shown in the tutorial. I’ve tried it a number of times and checked and rechecked the commands. I’ve even tried running them in a different order with no luck.
I really enjoy the tutorials on here, but this one was making me feel stupid. Glad i’m not the only one having this problem. 😉
To all having the problem with the Flattened oval being in the green section,
make sure the warp effect appear in the appearance panel before the Transformation, so it would look like:
Fill
Transform
Warp: Arc
Opacity: 50% Overlay
I’m running CS4 and having similar problems on Step 12 with the transform effects/warp and arch too. I’ve tried a myriad of settings but nothing comes close to what’s pictured so yeah…..must be a version mis-match. Otherwise – great tutorial, thank you!
I’m pretty new to Illustrator and will keep experimenting with other methods but if anyone has suggestions as to how the crescent shape could be easily created I would appreciate some direction too. 🙂 thanks!
Please send me your Ai file at vforvectors@yahoo.com ?
Middle reference point is checked and still having issues
We’re sorry you’re still having troubles. We’ve checked into this and the only other thing it may be is your version of Illustrator may not include this feature. What version are you currently running?
Hi, I double checked the attributes used for those effects and everything seems to be fine. Can you send your Ai file at vforvectors@yahoo.com ? I’ll do my best to understand what went wrong.
There seems to be some errors with the “transform and warp” part of the the white overlay (Step 12).
I put the numbers in exactly as you say and the overlay is squished down far away from the button itself and it never actually curves upward as shown in the photos.
I have the same issue, have you found out how to resolve it yet?
Also having the issue. If someone finds a fix please do share.
You may want to double check that when using the transform effect, make sure that the middle reference point is checked.
the error can be fixed by typing a negative number -30 instead of a positive number 30 under “move->vertical”. And just in case make sure the fx layers are in the same order as in the picture (“transform” on top)
Really good tutorial, thank you very much for such professional content!
You are awesome, amazing, you are my teacher the Ilustrator favorite !!!!!!!!!!!!!!!!!!!!!!!!!!!!!