
In this tutorial, I will show you how to create a trendy seamless type pattern in Illustrator using some text and icons. Although I won’t go in-depth about creating the icons, we will take a close look at creating a seamless pattern swatch. You can easily apply these techniques to other seamless pattern swatches.
Final Image
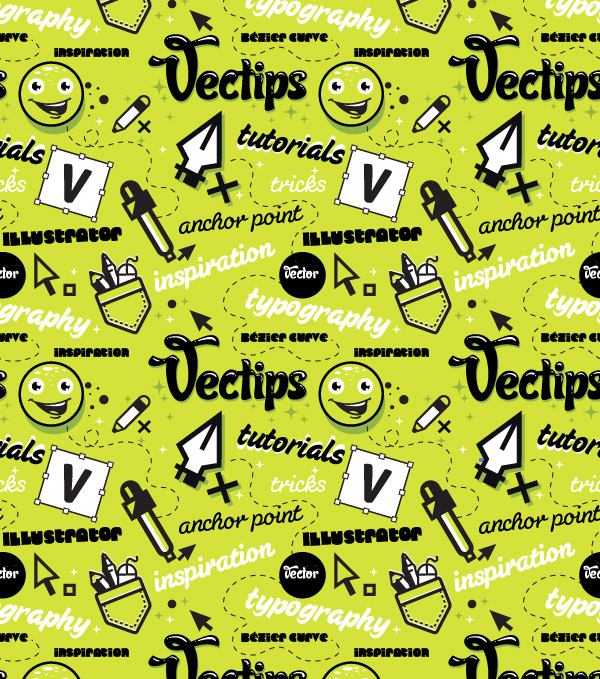
Below is the final pattern we will be working towards.
Tutorial Details
- Program : Adobe Illustrator CS4
- Difficulty: Intermediate
- Topics Covered: Pattern Swatches
- Estimated Completion Time: 1 hour – 1.5 hours
Step 1
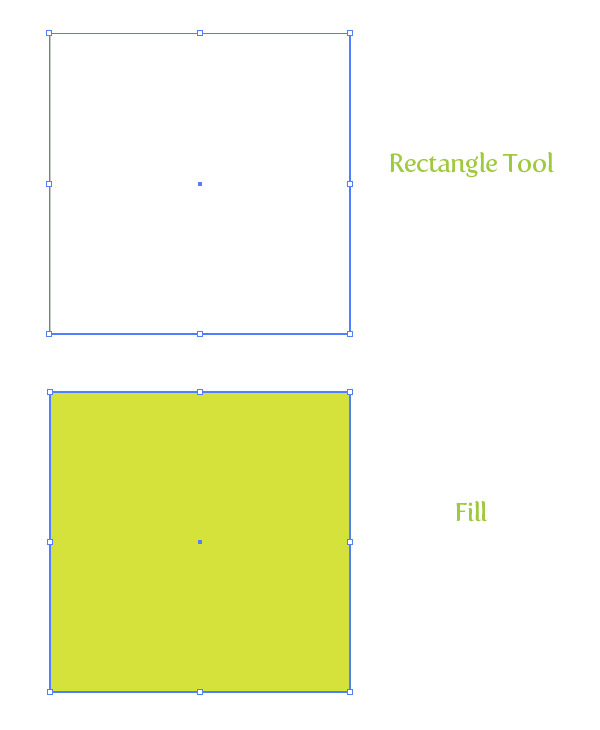
Create a new document and use the Rectangle tool (M) to create a square. For the pattern, you are going to want a square with simple values (100 px as opposed to 101.375 px) so it is easy to recall the values when moving and transforming. I am using a rectangle that is 300 px by 300 px. Fill the rectangle with a base color and take off any stroke.
Step 2
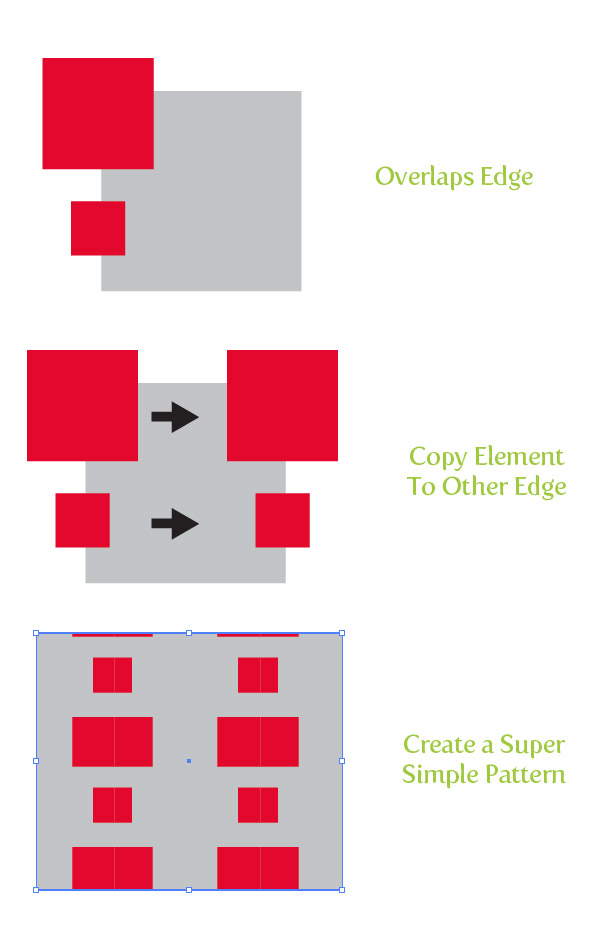
In a seamless pattern, elements that overlap edges over our square need to be copied to opposite edges to create the repeated seamless effect. If an element is hanging off the left edge 10 px, you have to make sure the element is repeated on the right edge 10 px from the edge. This seems more complicated than it really is. Basically we Copy (Command + C) an element, Paste in Front (Command +F) and move to the opposite edge with a value equal to the dimensions of the our original square’s edge (in the case of this tutorial, 300 px). It will make more sense when you see it in action in the next couple of steps.
Step 3
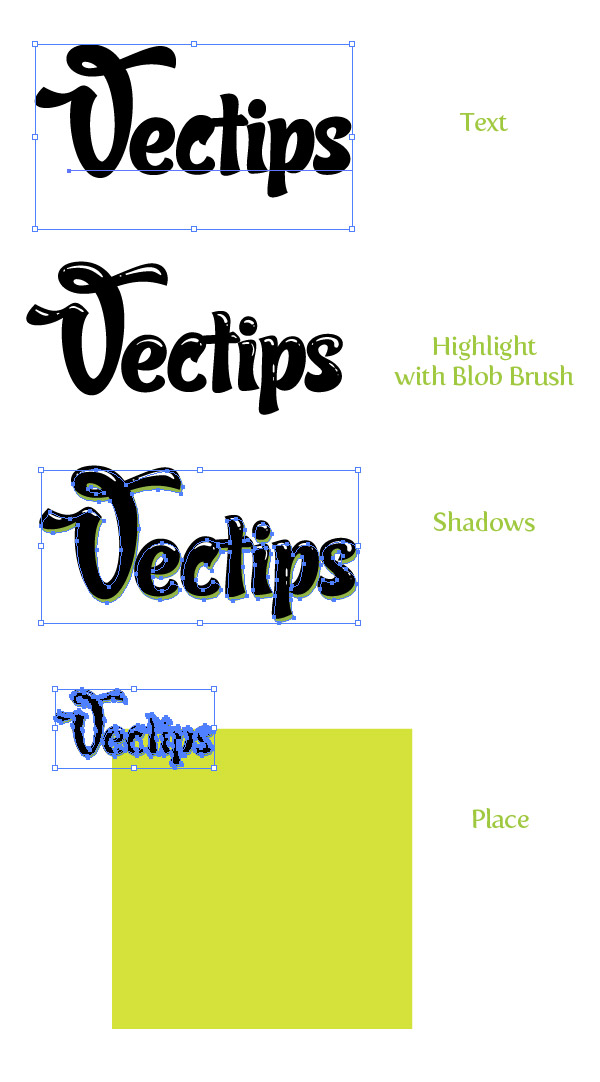
With the Text tool (T) create some text and choose a fun font. I am using Candy Script. I added some highlights with the Blob brush, which you don’t have to do. I also created a simple shadow by Copy (Command + C), Paste in Back (Command + B), and changed the fill of the text. Group (Command + G) all the text elements and place over the top left corner of the square.
Step 4
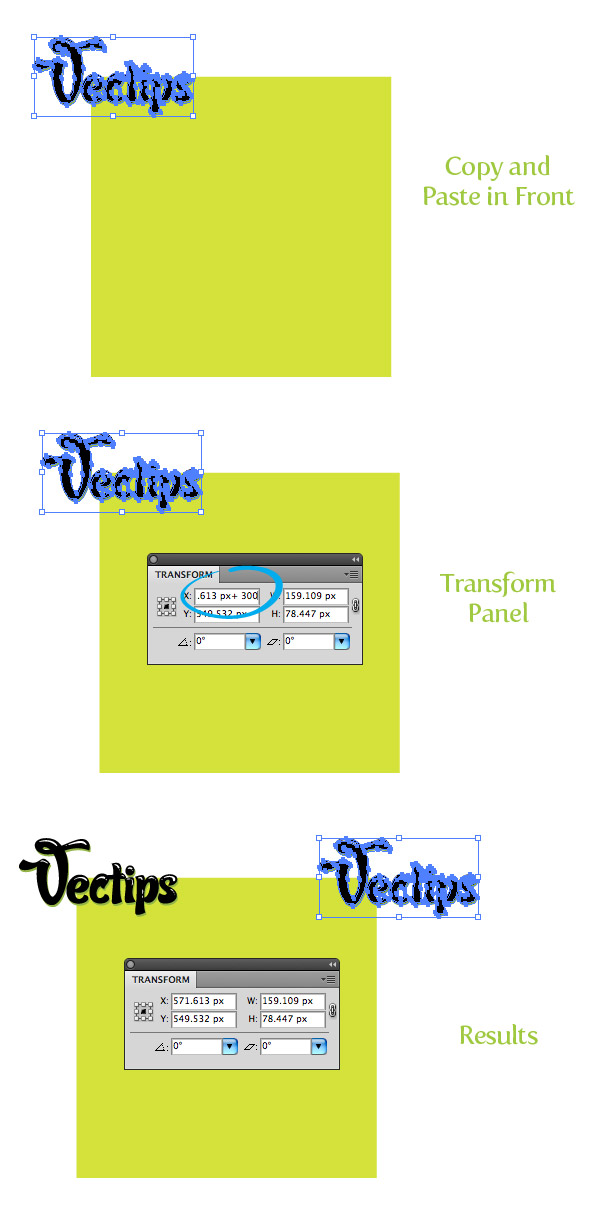
Since we placed the text over the top and left edge, we have to make sure it will repeats over the bottom and right edges of the square. With the text elements selected, Copy (Command + C) and Paste in Front (Command + F). With the text still selected, from the Transform panel type “+ 300 px” (the width of our original square) in the X Value AFTER the current X Value. After you press Return, you can see it moved the text the exact distant to make the pattern seamless.
Step 5
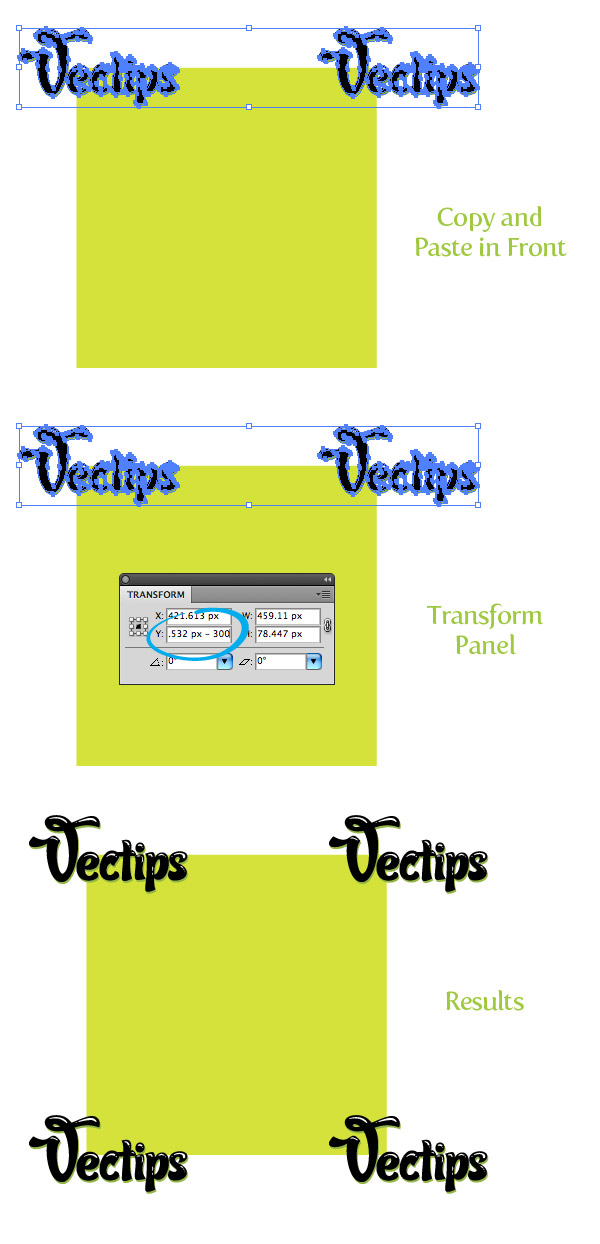
We repeated out text element on the right side, now we have to repeat our text over the bottom edge. Select both copies of the text element, Copy (Command + C), and Paste in Front (Command + F). With the copies still selected, type “- 300 px” in the Y value AFTER the current Y value. After you press return you should now see four text elements. To learn more about math function in Illustrator, read our Quick Tip: Math Function in Illustrator.
Step 6
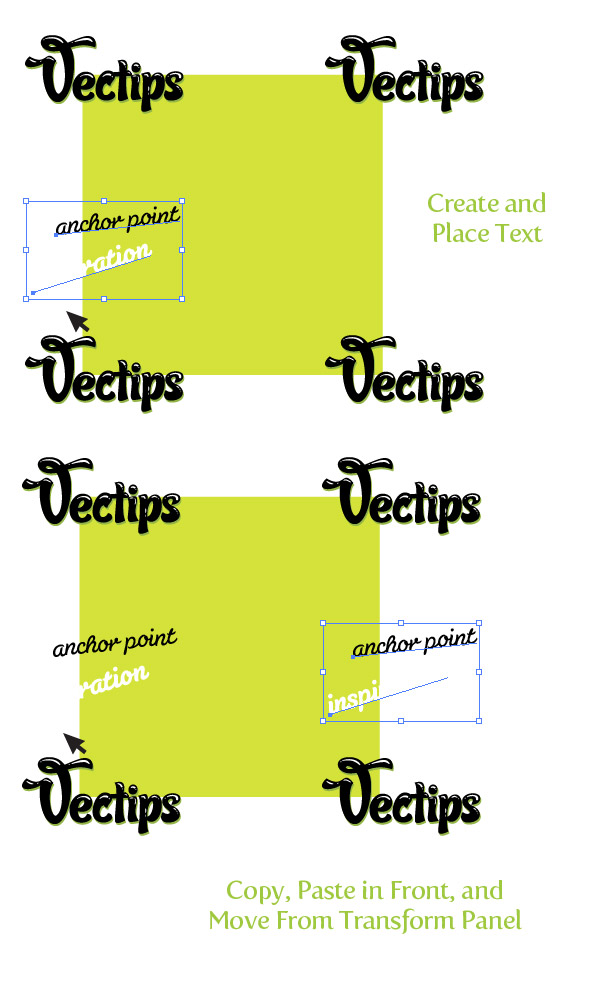
Now that we have our first element created and placed, we can start adding other overlapping edge elements that we need to copy, paste, and move. In the next step I choose a different font and typed out some text with the Text tool (T). I used the Selection tool (V), rotated some of the text, and changed the fill of one of them. This text is only overlapping the left side, so Copy (Command + C), Paste in Front (Command + F), and type “+ 300 px” (the width of our original square) in the X Value AFTER the current X Value.
Step 7
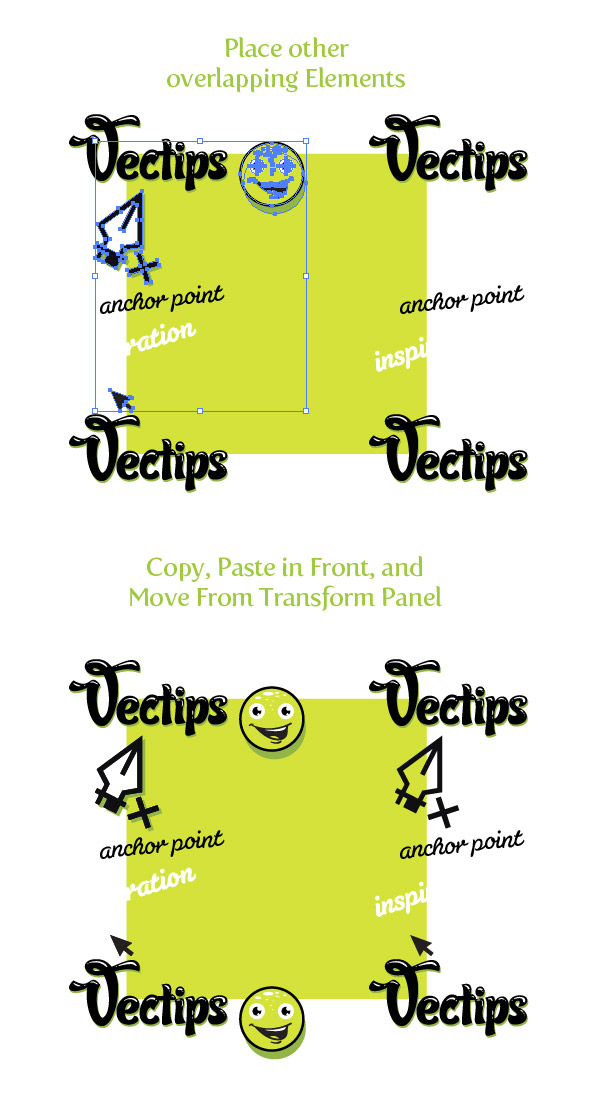
This is a good point to add some other elements other than text. I rounded up some logos and icons that I have created in the past. I won’t go into much detail about how I created the because I don’t want to take focus away from the pattern making. Basically I used the Pen tool (P) to create most of the Illustrator icons and added different fills and shadows to give it a little depth. I start by placing the icons in spots that are overlapping the edge before I fill in the middle of the square. Since there are overlapping edges, make sure to Copy (Command + C), Paste in Front (Command + F), and change the corresponding X or Y value from the Transform panel.
Step 8
Now that we have all the overlapping elements laid out, we can start filling in the rest of the square with other text and objects. I used some more text in different Susa, Sugar Pie, and Cooter Fonts. I used some more icons created with the Pen tool (P), dashed stroke elements, and warped ellipses. You can fill the square up with whatever elements you want.
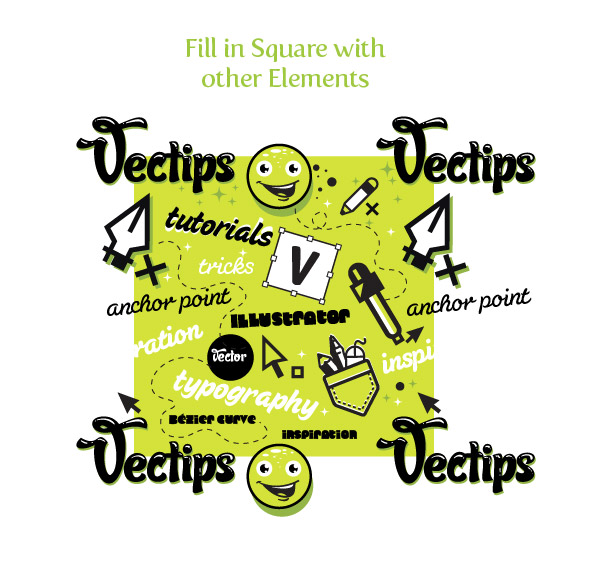
Step 9
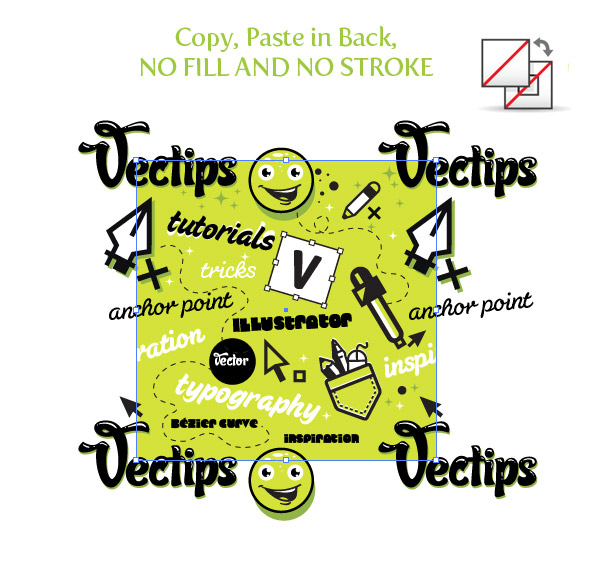
All are elements are done and now we can create a pattern swatch from the artwork! First, select the original square, Copy (Command + C), Paste in Back (Command + B), and take off any fill and stroke. We have to create this empty square copy so Illustrator can define the edges of the swatch. If we didn’t include this empty square shape, we will have a weird looking pattern that is not seamless.
Step 10
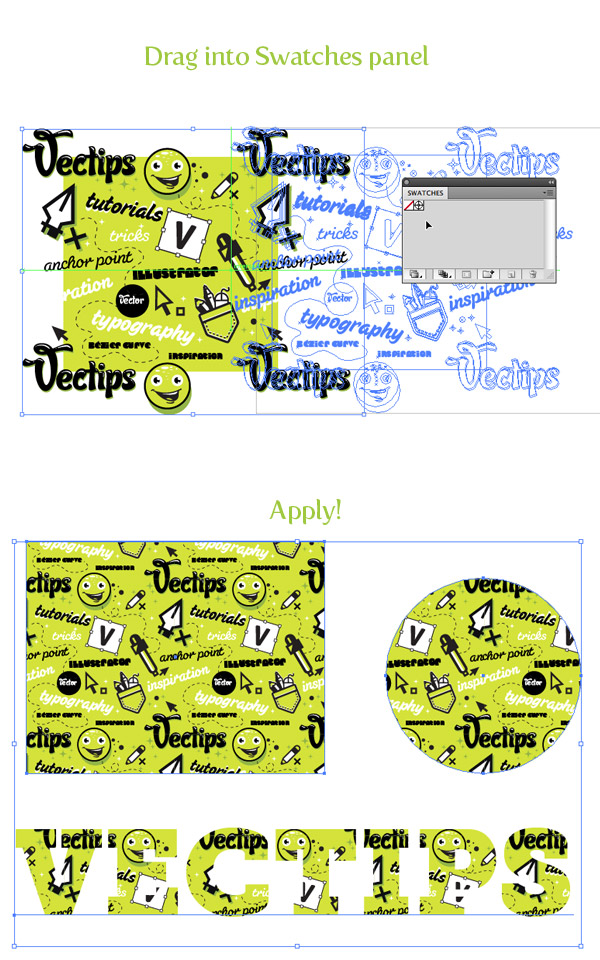
Select all the artwork and drag it into the Swatches panel. Now you can use your new seamless type pattern swatch on any object!
Final Images
Below is the final seamless pattern again. How did you do? Post links to your results in the comments! You can use these patterns on website backgrounds, Twitter backgrounds, printed projects and much more. I really want to make a throw pillow out of mine!


Very nice article, totally what I was looking for.
I am extremely impressed along with your writing talents and also with the format for your blog. Is that this a paid subject or did you modify it yourself? Either way stay up the excellent quality writing, it’s uncommon to see a great blog like this one nowadays.
Thanks so much. Easy to follow. Great results!
Milles merci! Thank you so much.
Thank you SO MUCH for this tutorial. I’ve never seen seamless patterns explained in this way and it’s like something just “clicked” after reading this. It will help me a lot with creating not only seamless type patterns but any seamless pattern. Seriously, thank you!!
When I drag it in CS5 it takes the things hanging over the edges-any fixes for that?
There’s definately a great deal to know about this subject. I like all the points you made.
Nice and easy to follow tutorial. Thanks!
such a great and easy to follow tutorial….thanks for posting
Fantastic tutorial, I wanted to learn this technique long time ago. Even though this tutorial is for Illustrator, I found a way around and used it for GIMP. Thank you for making this tutorial, much appreciated!!! :)))
This was wonderful. It makes sense and my pattern looks awesome. Thank you so much for the tutorial. Now the sky is the limit. Thanks.
Woow!
Very clever, thank you!
Are you still answering any doubts?
’cause I’ve been trying to make the patterns, I did all the steps above, including the “invisible” square, but when I drag it to the swatches it looks weird! I don’t know what might be.
Do you think that my Illustrator doesn’t identify the empty square?
I’d be thankful I you could answer.
Nince tuu by the way (:
This is the most, duh why didn’t I think of that, explanation I’ve seen so far. Thank you for saving me from my own pattern insanity. I’m a happy girl now!!
I did everything exactly as the tutorial says, but when I drag it into the swatches window it does not appear as a swatch. Does anyone know why?
Thankyou . . . had me puzzled and got me out of a spot . . . C:
Excellent tutorial. I moved to illustrator from freehand several years ago. I managed to pick up a few short cuts and tips along the way. Thanks for sharing.
I’ve put this pattern technique to use already and created a cool iPad cover:
http://mcgregorbrand.blogspot.co.nz/2012/05/playing-with-patterns.html
I’ll be putting this technique to good use now. Thanks again.
Ola Rype! Great tutorial and love your end pattern!! It’s super trendy! Here’s the heart pattern I made by following your tutorial http://cupcaketoons.com/2012/05/great-tutorial-on-how-to-make-seamless-patterns-in-illustrator/
Best tutorial on this EVER!!
ps best tutorial anywhere for seamless patterns!
Yea. I ran so out of breath looking for a perfect seamless pattern.. This one is so easy and so smooth to grasp. Thanks Vectips !!!
Step 5: in order for me to get the same result, I had to use + 300 px in the Y window (transform panel). Is this a typo or am I missing something?
Great tutorial, thank you so much! You made a complicated action seem very easy, I have looked through many other tutorials on this and yours is the easiest to understand!!!
nice work, very easy to understand with a incredibly great result!!
thanks a lot 🙂
I have been working with Illustrator for 6 years, but i never knew that putting an empty box in the back would cut of the pattern so easilly. I used to cut of the edges by using the pathfinder, was much harder to make a seamless pattern. This makes my life so much easier! Thank you very much.
cool man I like this.:>
Hi Ryan
thanks for the tutorial. I managed to get the pattern done however there is a thin white line through one of my characters that I had placed midway over the left edge. As the character is then repeated..the line shows again. I don’t know what I did because other objects placed on the edge do not have this line. Please help
I have the same problem, but I think it´s only in screen. I had made with other patterns of illustrator and happend the same. Sorry for my english.
Very useful!… thank you
Wow!! This is a great resource for web layouts. Awesome!!
Ryan,
Thanks for your tut on creating a seamless pattern. I was able to execute a pattern in a few minutes with my own vector icons. Special thanks to the coordinate insight. As a result this saved a lot of my production time with a folding carton house-branded series I have been working on.
Cheers E.
Oh my gosh, how freaking simple. I was looking all over the dang internet for a tutorial that was simple like this. Thank you, now I can enjoy my weekend and not have to stress over my work assignment. Thank you thank you!
This is one of the best tutorials I’ve found for seamless pattern making. I learned how to do this back in school at one point but I’d forgotten how to do it. I think this way works incredibly well and I’m pretty happy with how my pattern has turned out. Thanks so much!
Thanks so very much for this amazing tutorial. I’ve read seamless pattern tutorials in Ai but nothing like this.
I have one question, the pattern i create is local for the document i made it in. When i create a new document I lose the pattern. How can i keep is for every new file i make?
Thanks again.
Many thanks:very useful tutorial!
Thank you a lot! Great tutorial!
Looks stunning! I will try to do something similar for my website 🙂
hey, perhaps i’m doing something wrong..
but i can’t just drag it into Swatches.. it doesn’t seem to work.
could that be because i have CS5?
(or probably i’m missing something)
thx
T.
have the same problem… My CS5 cannot define the edges when I dragged it to swatches
Now how do you do this with diagonal lines? I can never get them to line up correctly when they tile in the fill…
This has got to be the best tutorial ever on how to create a seamless pattern! Thank you so much.
Awesome! Thanks 🙂
Great technique
thanks for this great tutorial
nice tut.. u’r tutorials looks amazing man ..
Many thanks for that – after a few mishaps I made it work and am now rather excited!
Perfect tutorial. I’m taking an online class at a college and the teacher could not demonstrate this efficiently. So glad I found yours. Thanks for sharing it!
Nice one. I like it… good job man!
I wrote similar tutorial on creating complex pattern in Photoshop few months ago. I’m using smart object and lots of nudging in the process. A reader told me that it’s easier in Illustrator. I think this is the perfect tutorial for Illustrator. Very nice.
http://psd.tutsplus.com/tutorials/designing-tutorials/quick-tip-create-a-complex-pattern-by-nudging-smart-objects/
Another way of moving the copied item to the other edge is to change your keyboard increment (found in General Preferences) to equal the size of your box. So in this example, you would change it to 300px. Then you select the duplicated item and use your keyboard arrows to move it up/down/sideways 300px.
Sweet thing, Ryan! Finally a decent tutorial on how to create seamless patterns! Simply brilliant – consider this tutorial bookmarked 😉
And awesome drawings on the final pattern 😉 Keep it up, mate!
Fantastic! Really useful, thanks a lot 😀
Used this for my twitter background http://twitter.com/BizarreRod
Wow! I’ve been searching for a decent pattern tutorial for yonks now! Legend, thanks.
It looks very good!Thanks for the tips very useful!
Thanks Rype, I’ve always had problems creating patterns in Illustrator, this has made my life so much easier!
I think it’ll be good if you publish a wallpapers from this tutorial
Also Not All Blacks are Rich black
Whatever Thanks For your Tutorials they are amazing keep on! 😉
Thanks for this tutorial – awesome work and very succinctly written 🙂
This has got to be the best tutorial ever on how to create a seamless pattern! Thank you so much. 🙂
The result is very cool!
Awesome tutorial! thanks for posting.
Very cool! Reminds me of Jared Nickerson’s work…
The result is pretty cool.
Thank you for those tips!
Thanks for the inspiration! I did this for my twitter in about 10 minutes: http://twitter.com/jrdesignworks.
Very cool and colorful result, I like it
sweet results! you should provide a few wallpapers to download! 😀
Thank you for sharing. Nice Tutorial
Here’s a quick one I did for a twitter background
http://twitter.com/MarcusAPenn
Great tutorial by the way
I was looking for something like this. Awesome!
this effect is really cool 🙂
Trendy indeed, although for a reason. Looks awesome!
awesome tutorial! thanks for posting!
Nice tut!
But you have written “tuorial” in the images!
Yikes! Thanks for catching my typo, all fixed!
The final image needs changing still 😉
Dang it! Thanks again, I think I have it this time.
Hi,
I am working on a pattern for my self promotion, and for some reason I cannot open my swatch in inDesign after I save it in illustrator. Any ideas on how to save it so I can open and use my pattern in inDesign?
thanks!
very good article.thank.