

In celebration of St. Patricks Day, I wanted to do a four leaf clover vector tutorial. Some of you might not celebrate St. Patricks Day or have no use for a four-leaf clover, but still take a look at this tutorial. This tutorial combines some good techniques. You will Divide, Transform, and add Warping Effects. These techniques will help you quickly and easily create with Illustrator!
Notes: St. Patricks Day Four Leaf Clover Vector
This four leaf clover vector tutorial was created with Illustrator CS3. But these features should be available in all CS versions.
Keyboard shortcuts are displayed in orange. ⌘ is displayed for the Command key (mac), with the Ctrl key being the Windows equivalent (not displayed).
Step 1: Creating the Leaf Shape
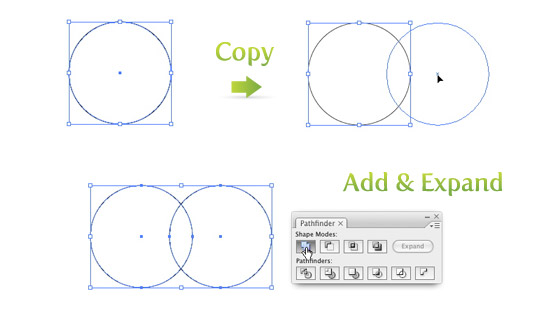
First, draw a circle with the Ellipse Tool (l). Select the circle with the Selection Tool (v) and hold down the Alt Key (copies the selected object) and the Shift Key (snapping object into place). With these keys pressed, drag out another copy of the circle. Select both circles and Add and Expand them from the Pathfinder Panel.
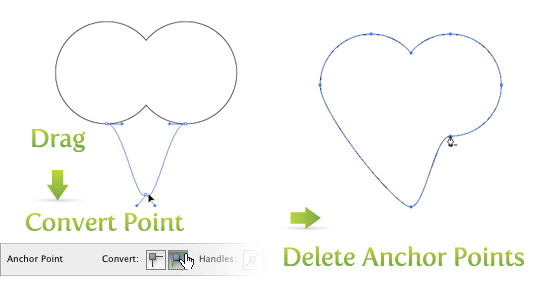
With the Direct Selection Tool (a), select the bottom anchor point where the circles intersect. With the anchor point selected, drag it downward, roughly double the length of the combined circles. With the anchor still selected, Convert it to a Smooth anchor point from the Control Panel. Next, use the Delete Anchor Point Tool (-) and delete the anchor points on the left and right side of the anchor point you just dragged out.
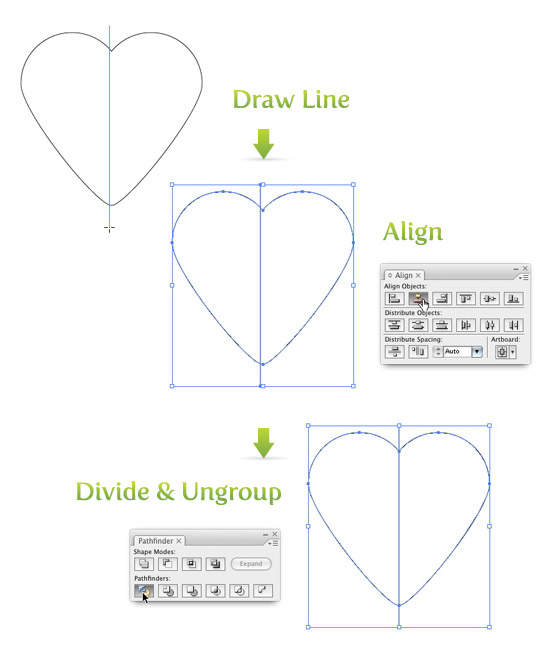
Now it is staring to look like a leaf, but it needs some color to really resemble our four leaf clover vector. Before adding color, we will divide the shape into two objects. With the Line Segment Tool () draw a line roughly in the middle of the leaf shape. Select both shapes and press the Horizontal Align Center in the Align Panel. With both objects still selected, press the Divide button in the Pathfinder Panel and Ungroup (shift ⌘ g) both of these shapes by going Object > Ungroup.
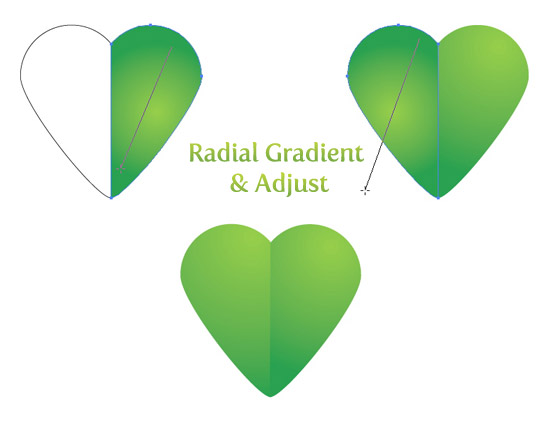
Select one of the shape and create a Radial Gradient from the Gradient Panel. Use a light green and a darker green for the swatches in the gradient. Use the Gradient Tool (g) and click and drag from the top right of the shape to the bottom left. Use the same Radial Gradient and gradient adjustments for the other leaf.
Step 2: Transforming
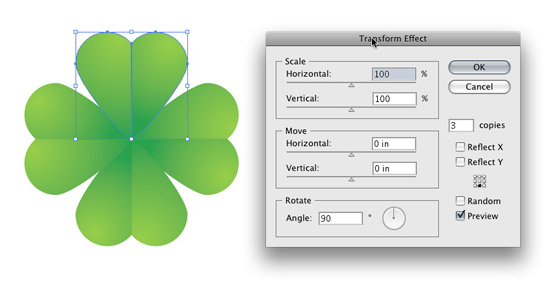
One leaf is done, but we need three more to complete our four leaf clover vector. We can just repeat the first step three times, but that would take to long. This is where the Transform Effect comes in handy. Select both sides of the leaf and Group (⌘ g) them. Next, go to Effect > Distort & Transform > Transform to bring up the Transform dialog. In the Transform dialog change the Copies to 3, Rotate 90 degrees, and click the bottom center point in the 9-Point Proxy (the box with nine points above the Random check box). Now the clover has four leaves. It is a good idea to go Object > Expand Appearance. If you don’t expand the clover, the next time you try to rotate it, you will get some undesired results. Next, comes the stem!
Step 3: Stem
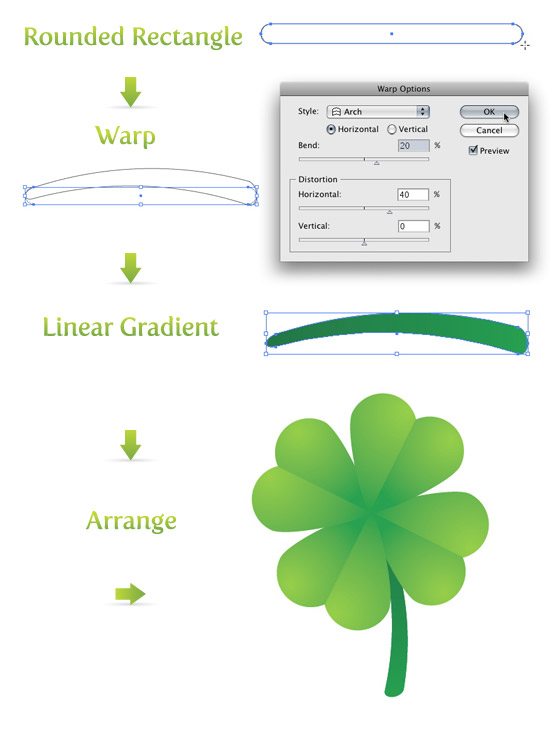
Draw a rounded rectangle the size you want the stem of your four leaf clover vector to be with the Rounded Rectangle Tool. Next, go Effect > Warp > Arch. In the Warp Options dialog, make the Bend 20% and the Horizontal Distortion 40%, while keeping the other options the same. After, go Object > Expand Appearance. Give the stem a Linear Gradient from the Gradient Panel with the swatches being darker greens than the clover leaves. Rotate the leaves and stem into the desired position and your done!
Experiment
Like, I said before, you don’t need to create a Four Leaf Clover Vector to utilize these functions. The Transform function is a great place to experiment. Try different angles, dimensions, copies, or points on the 9-Point Proxy. The Warp Effects are great for creating consistent shapes, and can be used almost anywhere. And don’t forget the Divide! It is a great way to create multiple object from a single object. St. Patricks day is coming in a couple of days, so those of you that don’t have time to create a Four-Leaf Clover, hop on over to iStock and buy a Shiny Four-Leaf Clover.


You have brought up a very fantastic details , thankyou for the post. Wit is educated insolence. by Aristotle.
Extremely educational looking forward to returning.
whoaaaaaaa…………
lovely tutorial
Please keep good stuff coming
Thank you. Good work
gr8 . thinks
my pic http://tinyurl.com/4jgjlp4
Exactly what I needed, when I needed it – awesome tutorial! Thank you!
I’m VERY new at this. Great exercise. Thanks and I look forward to more. And good point by DaveG. I guess that G stands for Guinness.
Great tutorial! I just would ask you if can use your clover as a blog image -it’s pretty, so so much!- If not, thanks again but I don’t think could find another such your.
awesome work .. more please…
good work !
Using CS2:
For some reason, when I divide, it divides the top and bottom, not the sides 🙁 I’ve tried from scratch again and got the same result.
Nice, Easy and Sweet with full of luck .. may be a pot of gold in the end
This is one cool tutorial. I wonder if this four leaf clover good luck charm will have the same magical power as the real four leaf clover?
Tnx!! i love this tutorial, i need how make this effect, now tnx of you i know how 😉
this is exactly what i need
great tutor.
thanks for the tutorial, now let me see how were the outlines created ?
great tutorial – very clear instructions – thanks
Dave,
Thanks for the history, I always wondered what the difference between 4 and 3 leaves were. Thanks!
I have a quicker method, if you illustrate a Shamrock, which is the unofficial badge of Ireland, you’ll only have to do three leaves.
The leaf is linked to St Patrick because he likened the three leaves of the Shamrock to the Holy Trinity, Father, Son & Holy Ghost.
Just thought I’d offer up my two cents 🙂
I’m a Freehand user and i’m learning illustrator now, and tutorials like this help me a lot. Thanks, and keep the good work!
Fantastic tutorials! You explain things really well- even for a beginner like me! Keep it up!
Thank you! Beautiful & very helpful again. Please keep up the good work!
Muito bom o tutorial! Não sabia que dava para aplicar o efeito ‘warp’ em ‘shapes’.
Sorry for the portuguese, but my english is terrible!