

Here’s a great tutorial on how to create your own customizable web 2.0 button vectors! These shiny button vectors can pretty much be used for everything, and once you get the hang of it, you’ll be able to transfer these steps to any shape or style.
Notes: Web 2.0 Button Vectors
This Web 2.0 Button Vectors tutorial was created in Adobe Illustrator CS3. Most, if not all, functions should be available in Illustrator 10 and up. Functions specific to Illustrator CS3 will be noted.
Keyboard shortcuts are displayed in orange. ⌘ is displayed for the Command key (mac), with the Ctrl key being the Windows equivalent (not displayed).
Step 1: Web 2.0 Button Vectors
Create The Sticker and Fold Shapes
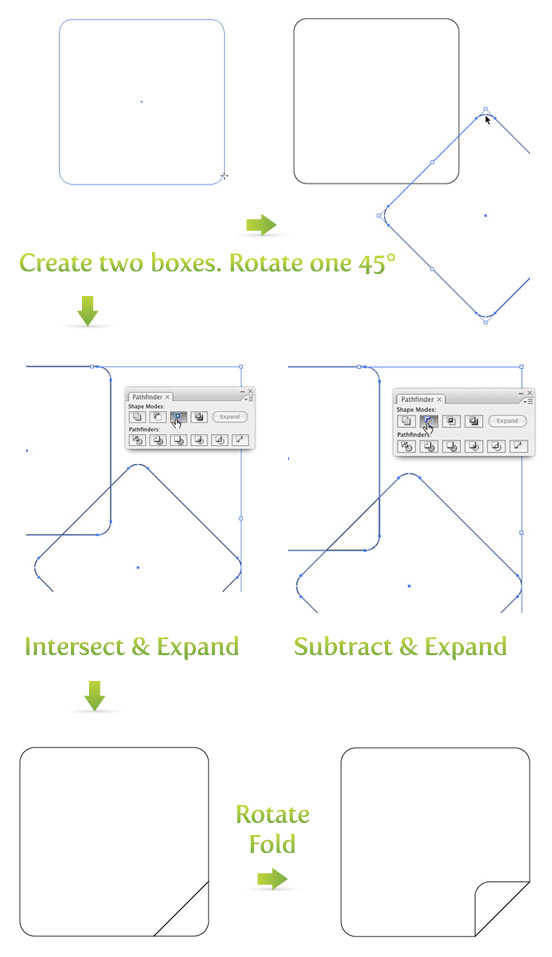
To start this web 2.0 button vectors tutorial, create a box with rounded corners with the Rounded Rectangle Tool. Next, create another box that is a little smaller. Grab a corner of the second box with the Selection Tool (v), hold Shift, and rotate the box 45 degrees. Place the second box on the bottom right corner of the first box where you would like the fold of the sticker. Copy (⌘c) both boxes and Paste In Front (⌘f). Select one of the original boxes and one of the rotated boxes and Intersect and Expand the shapes, creating the fold. Take the second copy of each box and Subtract and Expand them, creating the sticker. Now, select the fold, grab a corner, hold Shift and rotate 180 degrees.
Step 2: Create The Shimmer Shape
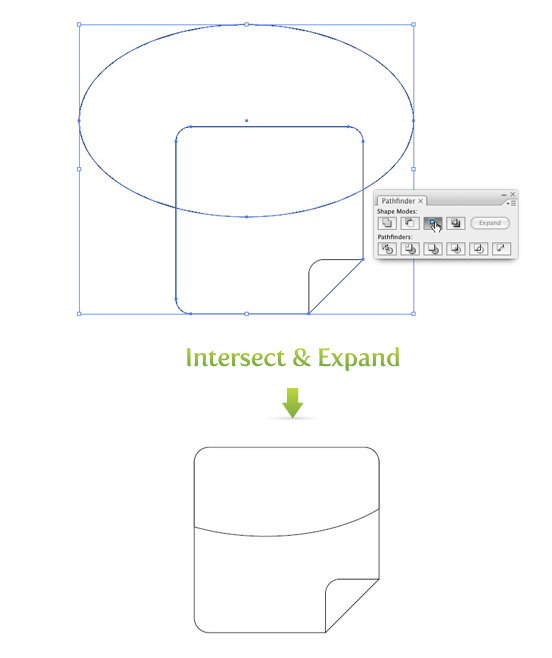
Use the Ellipse Tool (l) and draw a circle half way down the sticker overlapping the left, top, and right corners of the sticker shape generously. Copy (⌘c) the sticker and Paste In Front (⌘f). Take one sticker shape and the circle and Intersect and Expand, creating the shimmer shape.
Step 3: Create The Shiny Effect
In this step I am briefly going to explain using gradients to create the shiny effect on the web 2.0 button vectors. If you need a more in depth explanation, refer to Step 3 in my previous post Shiny Buttons Without Blends or Transparencies.
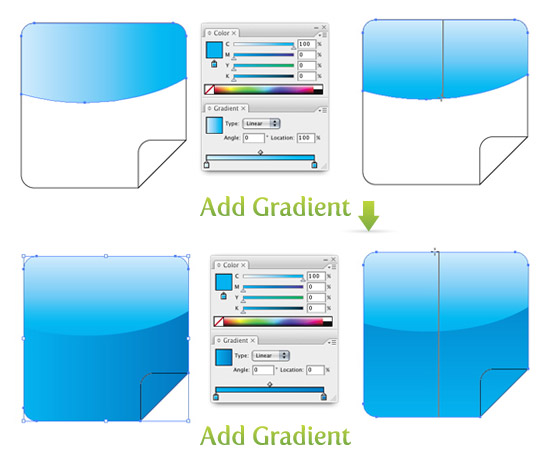
Use the follow steps for the shiny effect.
- Select the shimmer shape and create a Linear gradient with the first swatch in the gradient 20% Cyan and second swatch in the gradient 100% cyan.
- Adjust the gradient with the Gradient Tool (g).
- Remove the borders.
- Select the sticker shape and create a Linear gradient with the first swatch 100% Cyan and the second swatch 100% Cyan and 50% Magenta.
- Adjust the gradient with the Gradient Tool (g).
- Remove the borders.
Again, if that was too brief, refer to Step 3 in the Shiny Button post.
Step 4: Adding Detail to the Fold
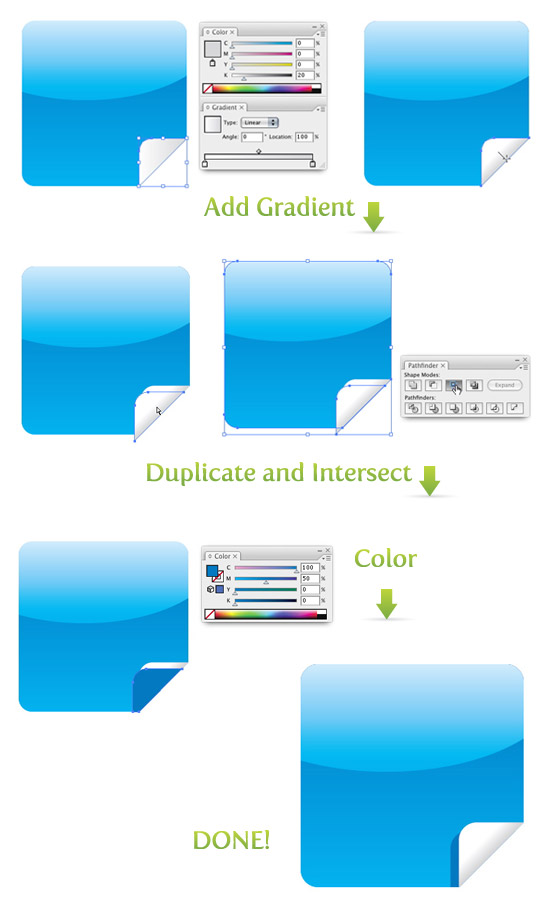
Now it is time to give the fold some depth. Select the fold shape and create a Linear gradient. Keep white as your first swatch, select 20% black as the second swatch and remove the border. When you adjust this gradient, start in the middle of the fold shape, hold Shift, and drag out to the bottom right of the fold at a 45 degree angle.
Now the fold is looking pretty good, but to give it a little more depth we can add a shadow to the fold. Select the fold shape, hold down the Alt/Option button and drag the shape slightly down and to the left. Copy (⌘c) the the sticker shape and Paste In Front (⌘f). Select the newly copied sticker shape and the copied fold shape and Intersect and Expand. Change the color of the fold shadow to 100% Cyan and 50% Magenta. Select the original fold shape and Bring It To The Front (⌘ Shift ]). Now you have a fancy Web 2.0 sticker!
Step 5: Expand
These web 2.0 button vectors stickers look great with icons or text on them, just experiment! Try adding different colors, shapes, or whatever.


Very cool. Mine wasn’t exactly how yours is but basically the same thing. I always wondered how to make these fold shapes and this helped me to understand how to do it. I still have to internalize the instructions so I remember them for future designs. It would be nice if someone made a book for Illustrator giving instructions on how to make basic shapes to complicated designs…maybe in the future.