
 Thanks to emoticons and emojis our communication on the internet has become more expressive and fun than just a boring text. Let’s follow this tutorial and create our own smiling emoticon, using simple geometric shapes, the Mesh Tool and Blending Modes to make it look dimensional and vivid!
Tutorial Details
- Program: Adobe Illustrator CS6 – CC
- Difficulty: Intermediate
- Topics Covered: Mesh Tool, Shape Building, Pathfinder Panel, Blending Modes, Gradient Tool
- Estimated Completion Time: 20 minutes
Final Image: Smiling Emoticon
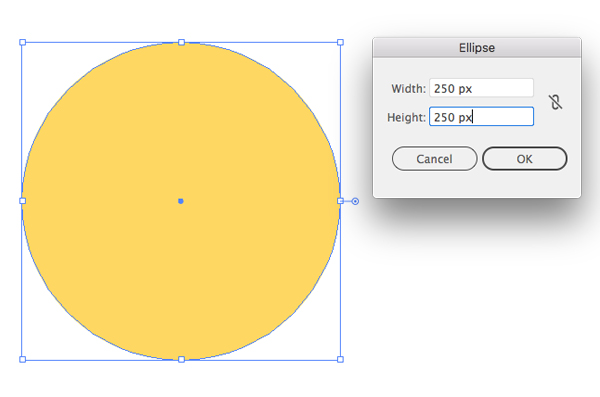
Step 1
Let’s start creating our emoticon from a circle. Take the Ellipse Tool (L), hold Shift and create a 250 x 250 px yellow circle.
Step 2
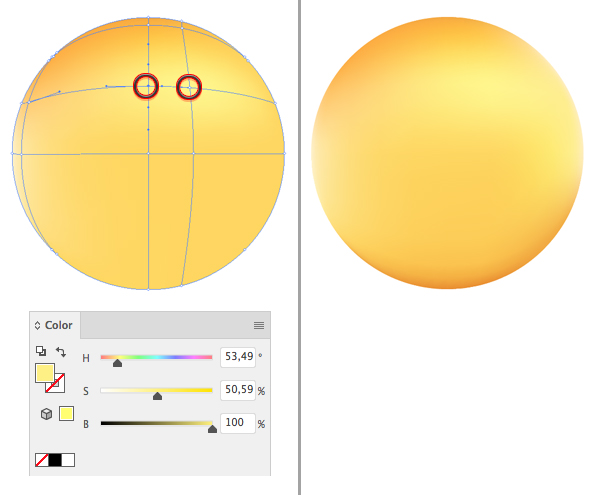
Grab the Mesh Tool (U) and click in the center of the circle to create a simple mesh. Now we can click again to create a new anchor point inside the mesh. Every time we click somewhere using the Mesh Tool (U), we create a new column or row. Let’s click on the horizontal line close to the left edge of the circle, creating a crossing point there.

Step 3
Use the Direct Selection Tool (A) to select the left anchor point on the edge of the circle and change its color to light-yellow in the color panel. This way we create a subtle highlight along the edge as if we had a light source there.
Move up and select the anchor point a bit higher. Change its color to orange. Then select another point right on top of the circle and fill it with orange color too, making our shape more dimensional.
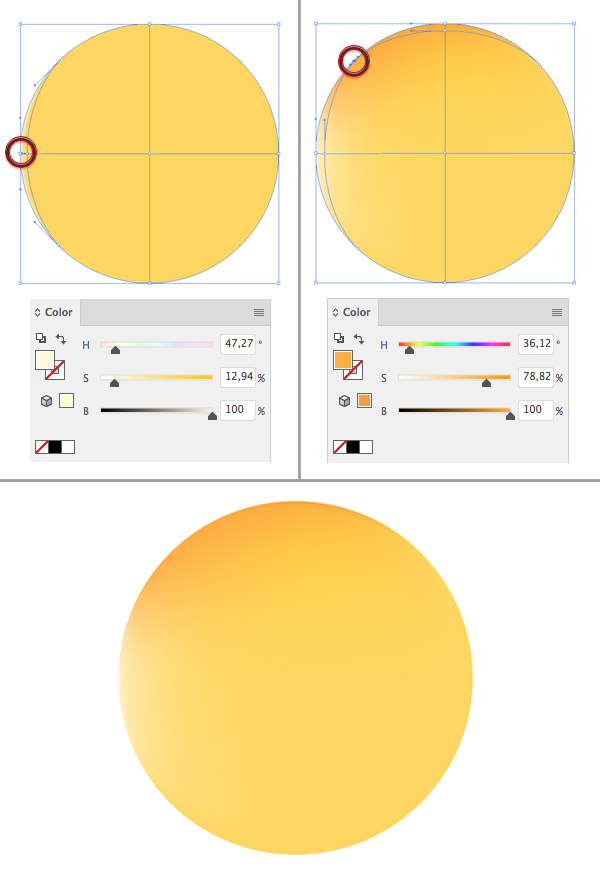
Step 4
Now let’s move to the front of the shape. Create another row and column in our mesh, select two points above the center of the circle and fill them with bright-yellow color, making an overtone. Now our circle looks more like a dimensional sphere and we can start adding facial details!
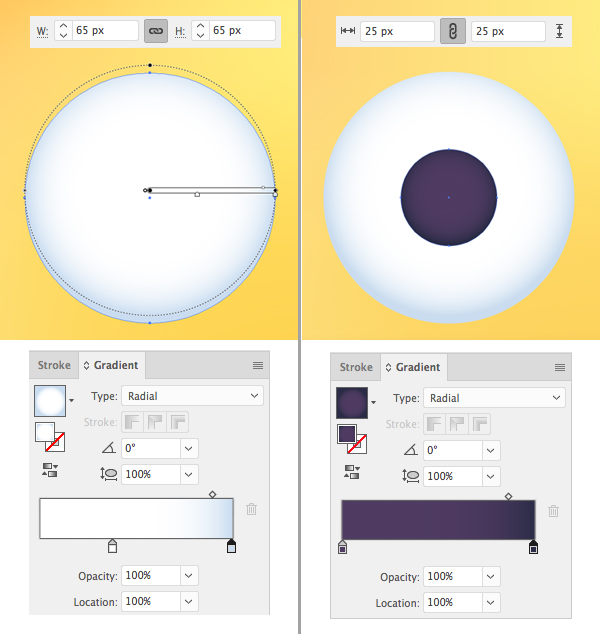
Step 5
Take the Ellipse Tool (L), hold down Shift and make a 65 x 65 px circle for the left eye. Fill it with Radial Gradient from white in the center to blue at the edges, depicting a realistic eyeball.
We can adjust the position of the gradient and its sliders using the Gradient Tool (G) and the Gradient panel (Window > Gradient).
Create another circle of 25 x 25 px on top of the first one for the iris. Fill it with a radial gradient from purple in the center to darker purple at the edges.
Step 6
Depict a simple highlight on the eyeball by creating a 10 x 10 px white circle.
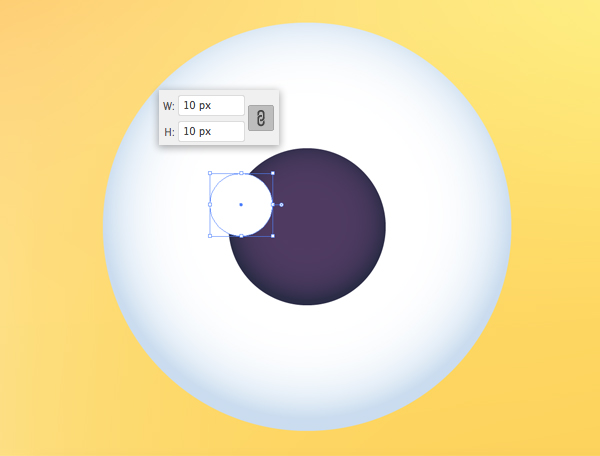
Step 7
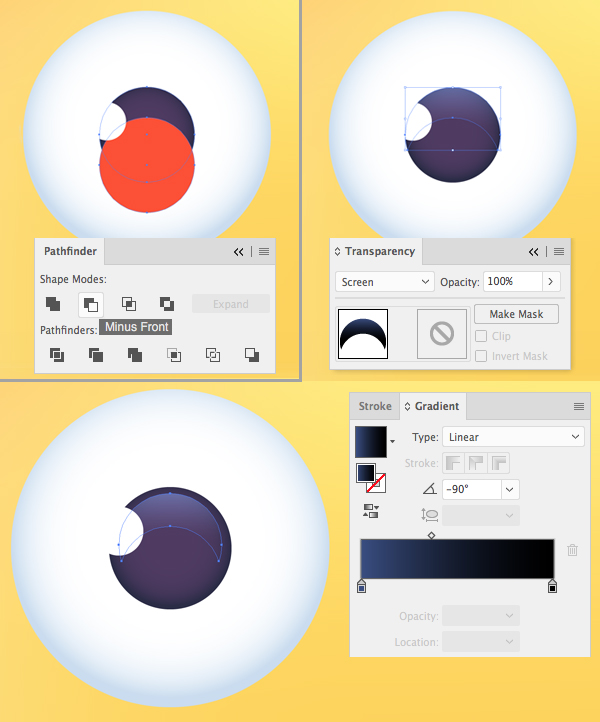
Let’s add a stylized reflection to the iris. Copy (Control-C) the iris and Paste in Front twice (Control-F > Control-F). Move the top copy down. Select the top copy and the one beneath it and click Minus Front in the Pathfinder panel.
Fill the created crescent shape with a vertical linear gradient from blue to black and switch its Blending Mode to Screen in the Transparency panel to create a semi-transparent subtle reflection.
Hold Alt-Shift and make the shape a bit smaller.
Step 8
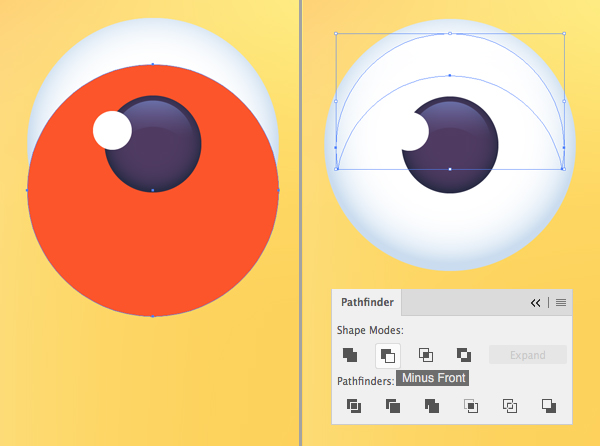
Let’s use the same technique to add a reflection to the eyeball. Duplicate the big eyeball shape twice (Control-C > Control-F > Control-F) and drag the top copy down.
Use the Minus Front function to cut two copies, creating a crescent shape. We can use the Eyedropper Tool (I) to pick the appearance from the previous reflection and apply it to the selected shape. This way we automatically apply both the linear gradient and the Screen Blending Mode.
Step 9
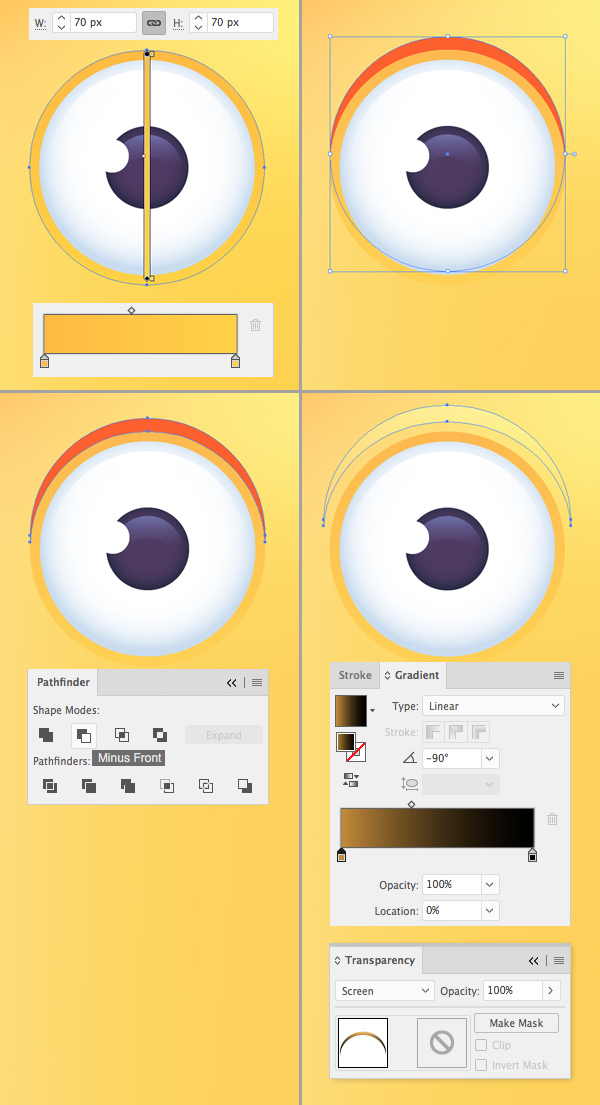
Now that the eye itself is ready, let’s add more details around it to make it fit the face better.
Copy (Control-C) the eyeball and Paste in Back (Control-B). Make the copy bigger (70 x 70 px) and fill it with a vertical linear gradient from dark orange on top to yellow in the bottom, thus creating an effect of depth.
And let’s add a simple highlight as we did previously. Duplicate the shape twice and move one of the copies up. Select two copies and apply Minus Front. Fill the created crescent shape with linear gradient from brown to black and switch its Blending Mode to Screen.
Step 10
Let’s Group (Control-G) all the elements of the eye and create the second eye by holding down Alt-Shift and dragging the group to the opposite side.

Step 11
Now we move on to the mouth. Use the Ellipse Tool (L) to create a 100 x 80 px ellipse with thick 8 pt Stroke and no Fill. We can adjust the Stroke Weight either from the control panel on top or from the Stroke panel (Window > Stroke).
Let’s take the Scissors Tool (C) and click the side anchor points to split the shape apart. Delete the top half to form a smile. If you want to make its tips rounded, just select the Round Cap in the Stroke panel.
Once you’re happy with the size and thickness of the line, go to Object > Expand. Now we can apply a radial gradient, making the center of the shape lighter.
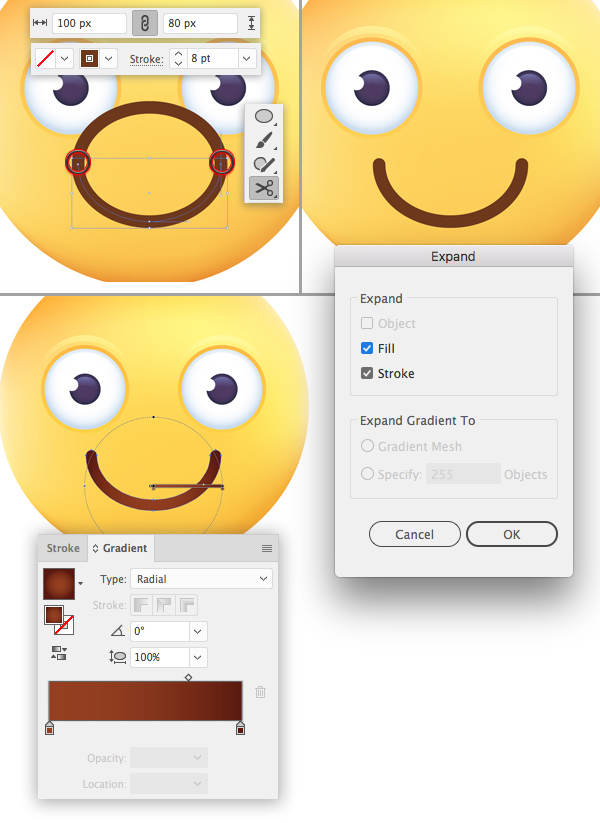
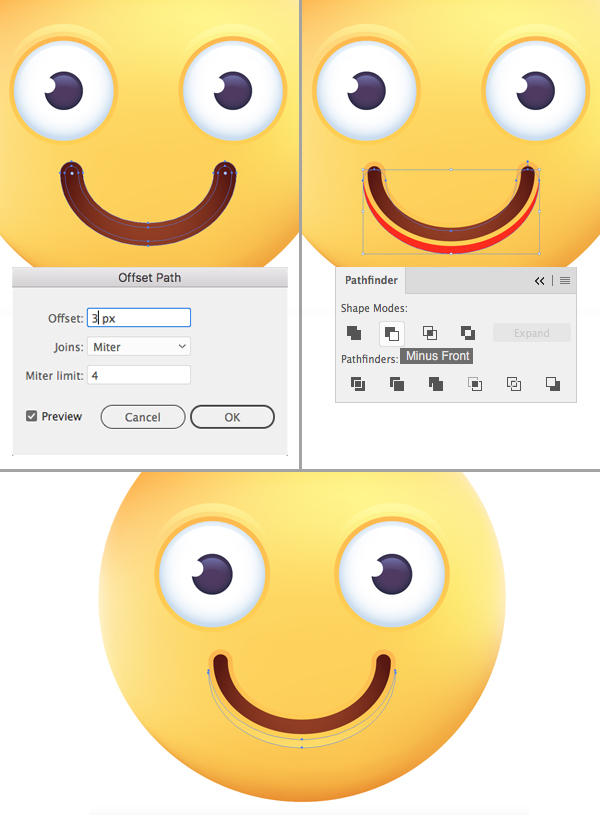
Step 12
Let’s add shadows and highlights! Keeping the mouth selected, go to Object > Path > Offset Path and set the Offset value to 3 px. Fill the created outline with an orange-yellow linear gradient (as we have around the eyes).
Duplicate the shape twice and move one of the copies down. Use the Minus Front function and the Screen Blending Mode to create a highlight under the mouth to make it pop out.
Step 13
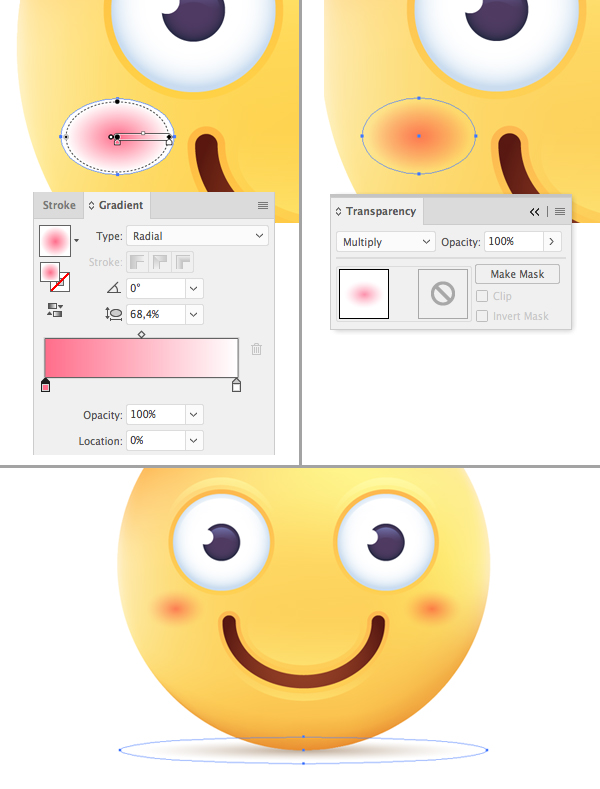
Let’s make a cute blush effect on the cheeks. Create a 45 x 30 px ellipse under the eye and fill it with a linear gradient from pink in the center to white at the edges. Squash the gradient using the Gradient Tool (G). Switch the Blending Mode to Multiply, making the shape semi-transparent.
Hold Alt-Shift and drag the copy to the opposite side of the face.
Finish up with the emoticon by adding a flat shadow beneath it, using the ellipse filled with a radial gradient from brown to white.
Congratulations! Our Smiling Emoticon is Finished!
There we have it, guys! I hope you’ve enjoyed following this tutorial and learned some new tips and tricks. Now you can create a whole set of funny little yellow guys with a complete set of emotions.
Have fun!


Enjoyed every bit of your article. Really looking forward to read more. Much obliged!.
Very good tutorial thanks
I think this is the great job for make smile many people in the world…
The steps are well explained, thanks for the knowledge