

In this tutorial we’ll draw a funny cartoon car in a simple stylized flat car. We don’t actually need any advanced drawing skills or even a tablet to create this stylized object as we’ll be working with basic geometric shapes and the most useful tools of Adobe Illustrator. Such simple and trendy illustrations are perfect for splash screens of mobile apps and for designing landing pages. Let’s get started!
Tutorial Details
- Program: Adobe Illustrator CS6 – CC
- Difficulty: Intermediate
- Topics Covered: Pathfinder Panel, Shape Builder Tool, Eraser Tool,
- Estimated Completion Time: 20 minutes
Final Image: Stylized Flat Car

Step 1
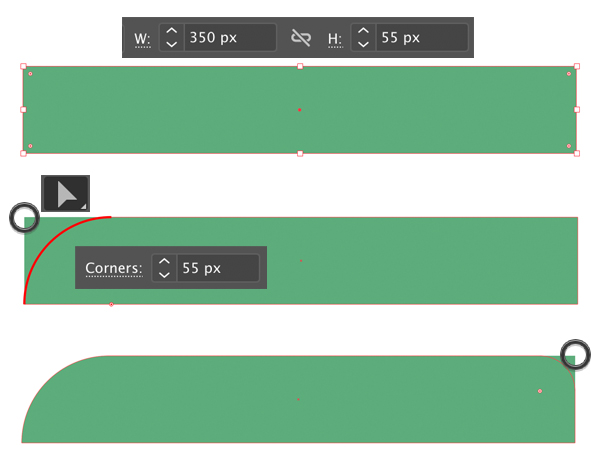
Take the Rectangle Tool (M) and start by creating a 350 x 55 px green shape for the base of the car.
Select its top left actor point with the Direct Selection Tool (A) and pull the circle marker of the Live Corner to make the corner fully rounded. We can also set the Corners value manually in the control panel on top.
Do the same for the opposite corner, but make it just slightly rounded.
Step 2
Let’s create the top part of the stylized flat car. Make a 220 x 160 px blue rectangle for the glass. Move its top anchor points closer to each other along the horizontal axis using the Direct Selection Tool (A) while holding down Shift.
Copy (Control-C) the created shape and Paste in Front (Control-F). Keeping the copy selected, take the Eraser Tool (Shift-E), hold down Alt and erase the bottom part of the shape leaving only a small stripe on top. Fill the remaining stripe with green color, creating a roof on top of our stylized car.

Step 3
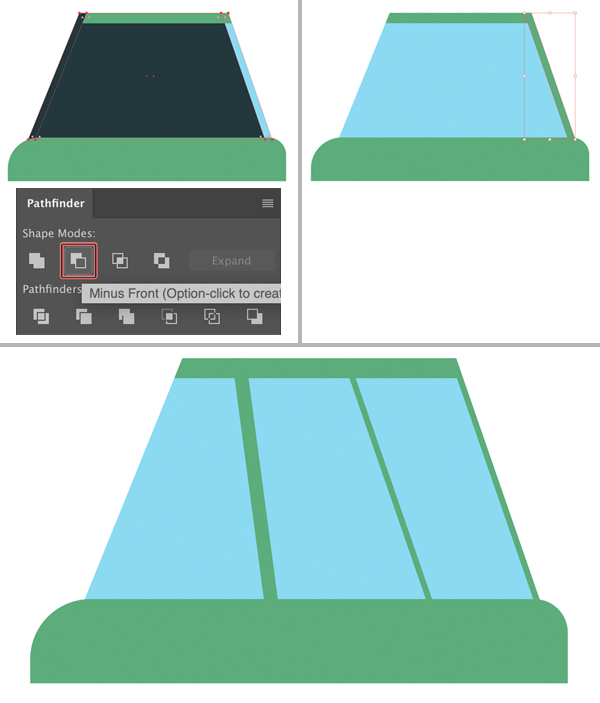
Let’s add more green metal details to define the look of our car. Select the blue part once again and Duplicate twice (Control-C > Control-F > Control-F). Move the top copy (I’ve filled it with black color to make it visible) to the left, as shown in the image below.
Select it together with the copy beneath it and use the Minus Front function of the Pathfinder panel (Window > Pathfinder) so that we have only a thin stripe along the right side of the glass. Fill this stripe with the same green color as we have for the other metal parts of the car.
Now we can select this stripe, hold down Alt-Shift and drag to create more copies. Use the Direct Selection Tool (A) to change the angle and thickness of the stripes by moving the anchor points. This way we add variety to the illustration making it look more stylized and cartoony.
Step 4
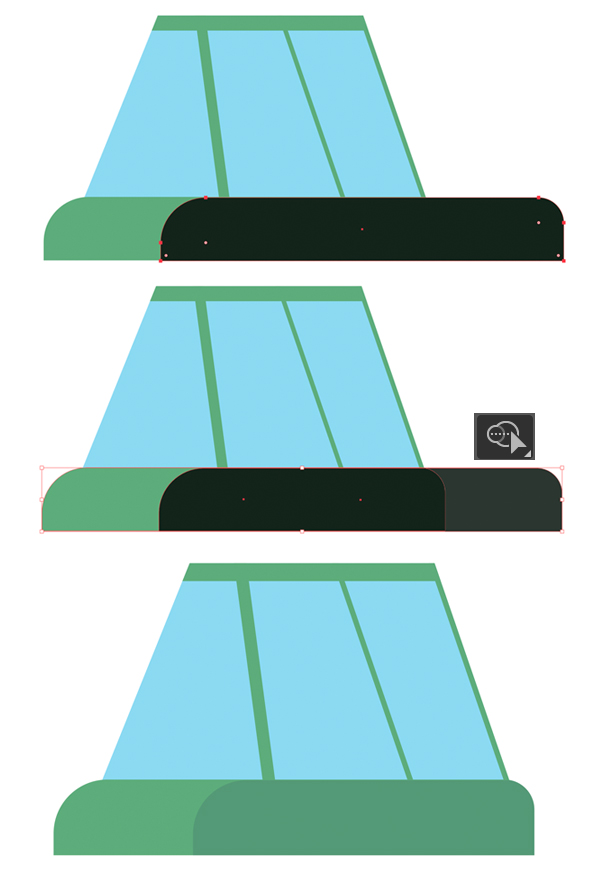
Now we’ll add a simple shadow to make the car a bit more dimensional by adding some volume to its base.
Duplicate (Control-C > Control-F) the base of the car and move the copy to the right by holding down Shift and dragging.
Select both shapes and let’s delete the piece on the right that we don’t need. Take the Shape Builder Tool (Shift-M), hold down Alt and hover the mouse over the part that we don’t need. Once it becomes grey, click it to delete. There we have it! Now we can fill the remaining piece with a darker green color for the shadow.
Step 5
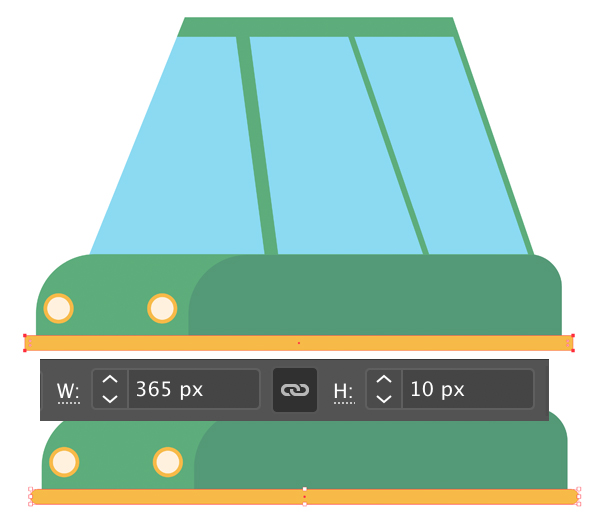
Let’s add some round retro-looking headlights to our stylized car. Use the Ellipse Tool (L) to draw a 20 x 20 px yellow circle.
Duplicate (Control-C > Control-F) the created circle and make the copy smaller (15 x 15 px). Fill it with white color to create the inner part of the headlights.

Step 6
Now that the headlights are ready, let’s create a bottom part of the car. Use the Rectangle Tool (M) to make a 365 x 10 px yellow shape. Make its corners rounded using the Direct Selection Tool (A) and the Live Corners feature.
Step 7
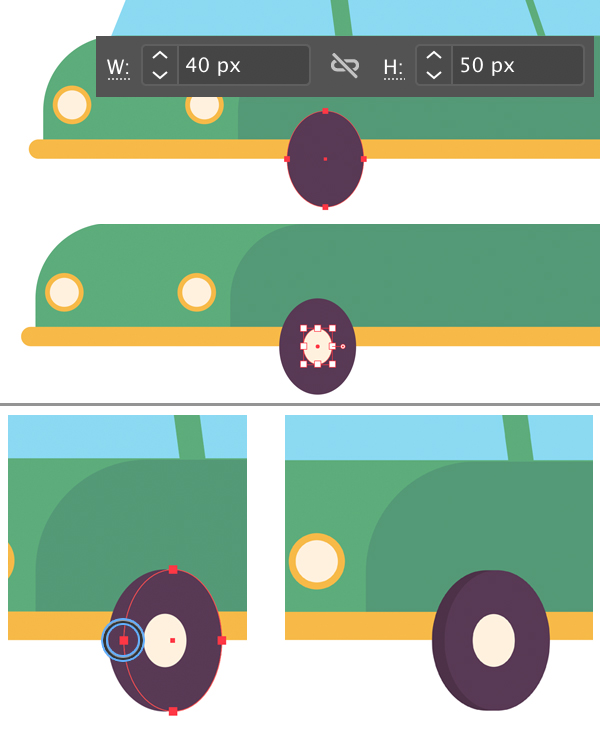
Let’s add the wheels! Use the Ellipse Tool (L) to draw a 40 x 50 px dark-brown oval. I never use pure black color for my images in order to make the palette more attractive for the viewer.
Add a smaller white oval in the center of the wheel.
Duplicate (Control-C > Control-F) the dark-brown wheel shape and use the Direct Selection Tool (A) to squash the top copy a bit to make it narrower. Make the lower copy slightly darker to create a shadow. This way the wheel looks more dimensional.
Step 8
Add two wheels on the opposite side of the car. We can Send them to Back by pressing Shift-Control-[ this way placing them in the bottom of the Layers panel.
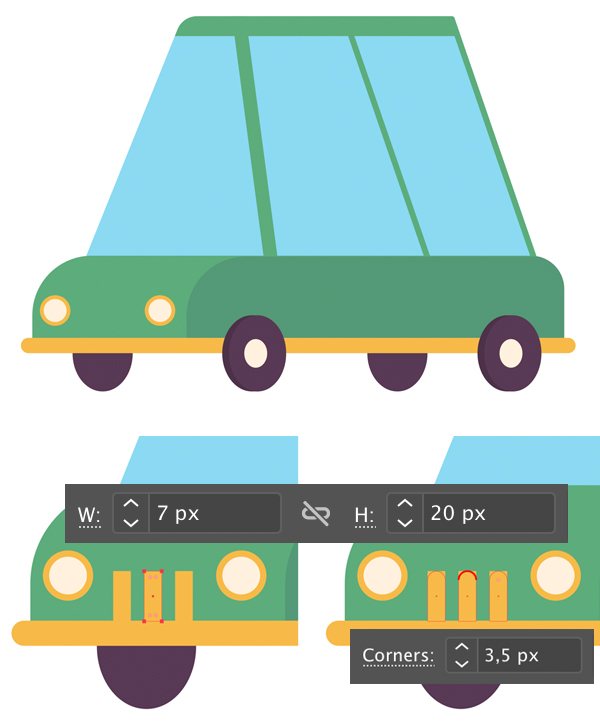
Use the Rectangle Tool (M) to add three narrow stripes to the front part of the car, depicting the radiator enclosure. Select the top points of each stripe with the Direct Selection Tool (A) and make the shapes rounded.
Step 9
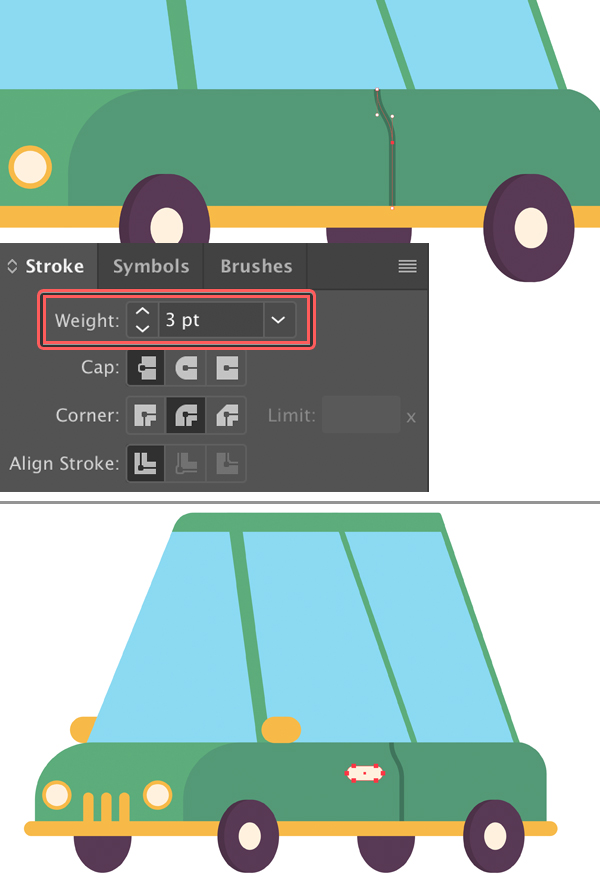
Use the Pen Tool (P) to draw a vertical line with dark-green Stroke color for the edge of the doors. We can pull the anchor handles with the Direct Selection Tool (A) to edit the shape of the line. We can adjust the thickness of the outline in the Stroke panel. Let’s set the Weight to 3 pt.
Finish up with the door by adding a small rounded rectangle for the handle.
Step 10
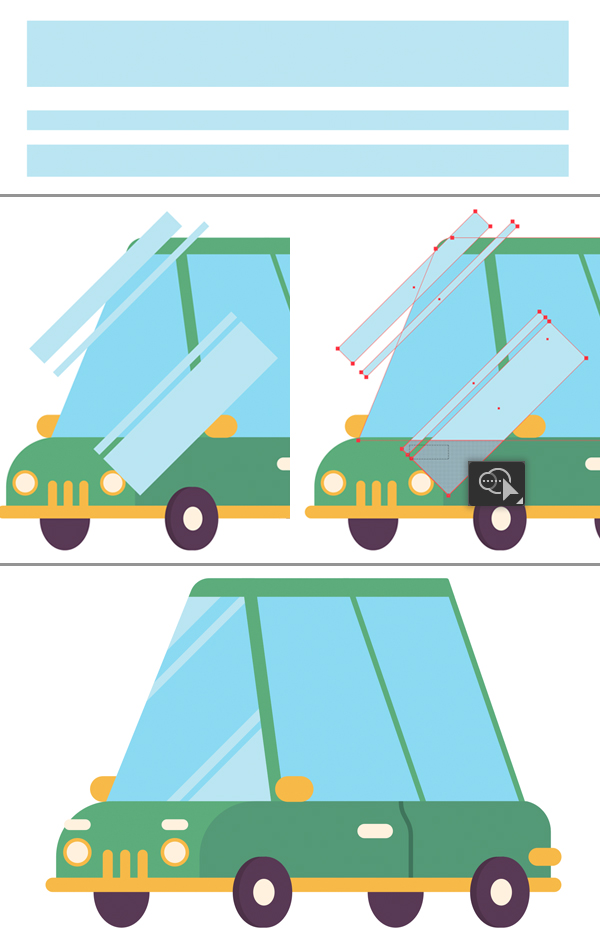
Let’s add some highlights to the glass. Start by drawing a set of rectangles of different height, as shown in the image below. You can draw a couple of sets consisting of two or three stripes, as you like. Select one group and press Control-8 to unite two separate elements into one object creating a Compound Path.
Rotate the stripes 45 degrees and places them over the glass so that the objects overlap.
Finally, we can use the Shape Builder Tool (Shift-M) to delete the unneeded parts by pressing Alt and clicking, and the Direct Selection Tool (A) to move the anchor points so that they fit the green edges of the stylized flat car.
Step 11
Now let’s finish up with the stylized flat car composition by creating a couple of simple elements that will be surrounding our stylized car.
We’ll be using a 600 x 600 px yellow square for the background of our illustration (you can set its size to the size of your Artboard or any other that will fit your design).
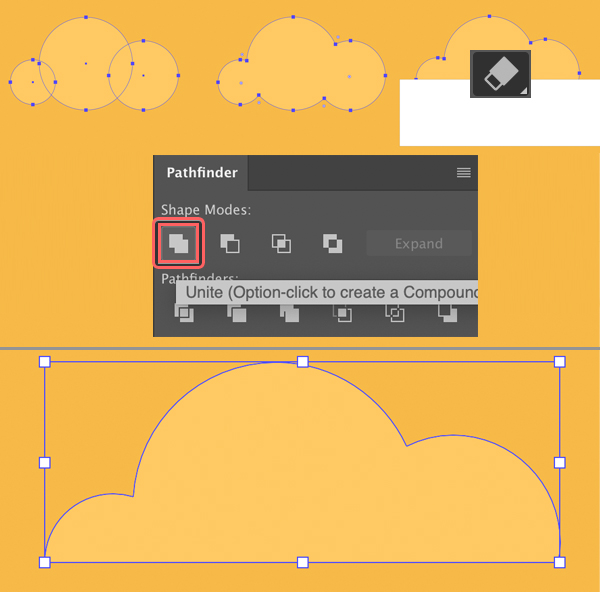
Let’s use the Ellipse Tool (L) to create a simple cloud. Make three overlapping circles of different sizes and Unite them in the Pathfinder panel.
Keeping the shape selected, use the Eraser Tool (Shift-E) while holding down Alt to erase the bottom part of the cloud.
Step 12
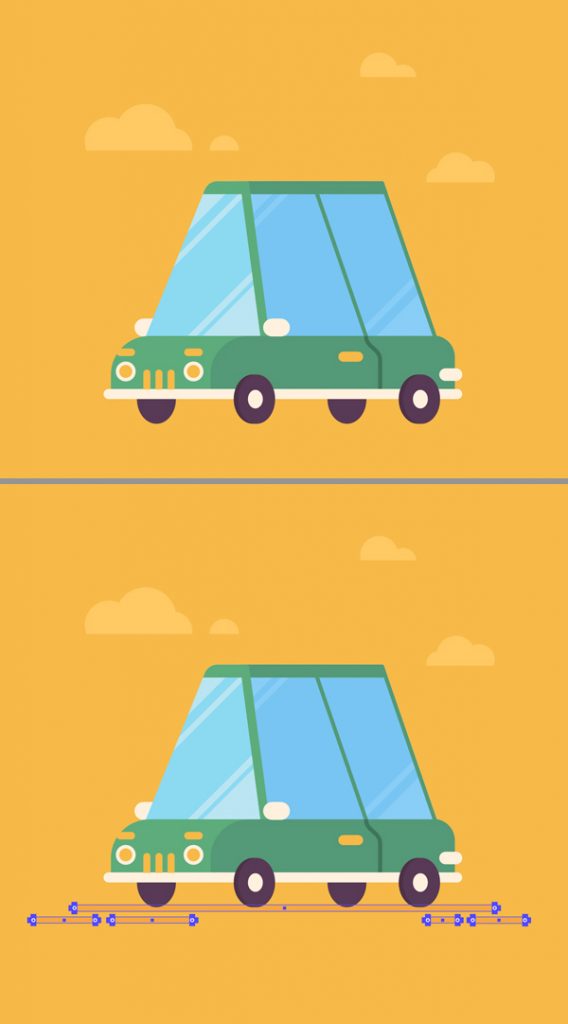
Now we have a simple cartoon cloud to fill the blank area above the stylized flat car! Add some more to create a balanced composition.
We can also use the Rectangle Tool (M) or the Rounded Rectangle Tool to add a few thin stripes depicting the ground under the car wheels.
As you may notice I’ve changed some of the colours of the car from white to yellow and visa versa to make it fit the yellow background better.
Awesome! Our Stylized Flat Car is Finished!
Great work! Now you can use these simple techniques we learned for our stylized flat car to create more illustrations in the same cartoon flat style. Try creating a house, for example, or a food truck.
I hope you’ve enjoyed following this tutorial and discovered something new that might be useful for you!
Stay tuned!
Author: Yulia Sokolova
2D/3D artist and tutorial instructor, focusing on character creation, icons, lettering design, and illustrations.


