
I wonder how long the Web 2.0 style will be around. All those shiny graphics are great to look at and create, but it can’t last. In some respects, it’s good to capitalize on the trend, but it the same respect it’s good to explore new techniques and styles. Regardless, there is enough demand with the Web 2.0 style to justify a tutorial on some nifty Web 2.0 Stickers!
Notes
This tutorial was created in Adobe Illustrator CS3. Most, if not all, functions should be available in Illustrator 10 and up. Functions specific to Illustrator CS3 will be noted.
Keyboard shortcuts are displayed in orange. ⌘ is displayed for the Command key (mac), with the Ctrl key being the Windows equivalent (not displayed).
Step 1: Create The Sticker and Fold Shapes
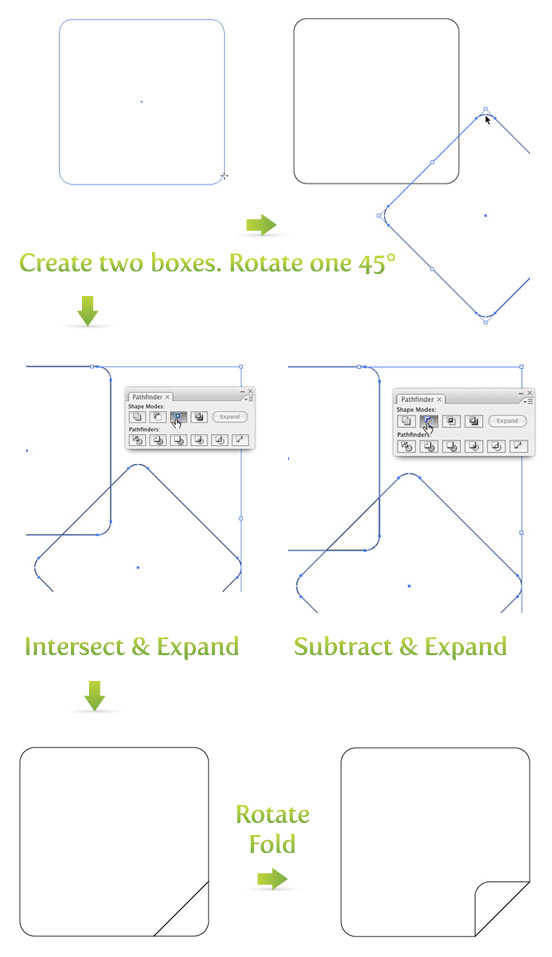
Create a box with rounded corners with the Rounded Rectangle Tool. Next, create another box that is a little smaller. Grab a corner of the second box with the Selection Tool (v), hold Shift, and rotate the box 45 degrees. Place the second box on the bottom right corner of the first box where you would like the fold of the sticker. Copy (⌘c) both boxes and Paste In Front (⌘f). Select one of the original boxes and one of the rotated boxes and Intersect and Expand the shapes, creating the fold. Take the second copy of each box and Subtract and Expand them, creating the sticker. Now, select the fold, grab a corner, hold Shift and rotate 180 degrees.
Step 2: Create The Shimmer Shape
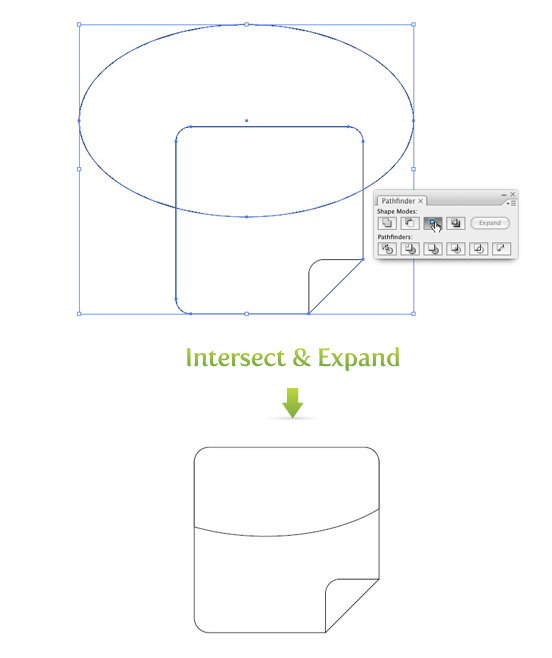
Use the Ellipse Tool (l) and draw a circle half way down the sticker overlapping the left, top, and right corners of the sticker shape generously. Copy (⌘c) the sticker and Paste In Front (⌘f). Take one sticker shape and the circle and Intersect and Expand, creating the shimmer shape.
Step 3: Create The Shiny Effect
In this step I am briefly going to explain using gradients to create the shiny effect. If you need a more in depth explanation, refer to Step 3 in my previous post Shiny Buttons Without Blends or Transparencies.
Use the follow steps for the shiny effect.
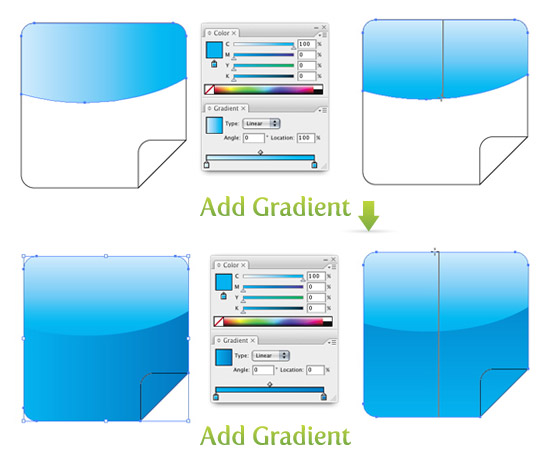
- Select the shimmer shape and create a Linear gradient with the first swatch in the gradient 20% Cyan and second swatch in the gradient 100% cyan.
- Adjust the gradient with the Gradient Tool (g).
- Remove the borders.
- Select the sticker shape and create a Linear gradient with the first swatch 100% Cyan and the second swatch 100% Cyan and 50% Magenta.
- Adjust the gradient with the Gradient Tool (g).
- Remove the borders.
Again, if that was too brief, refer to Step 3 in the Shiny Button post.
Step 4: Adding Detail to the Fold
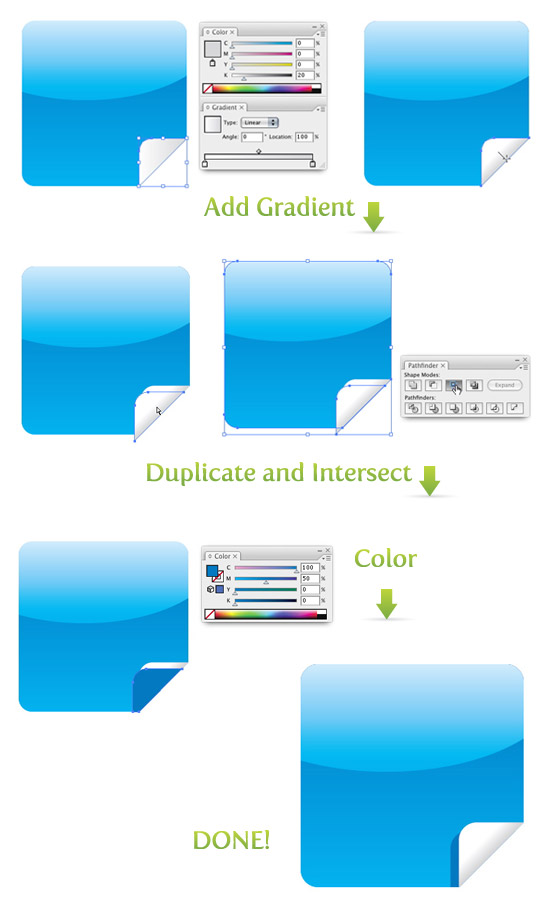
Now it is time to give the fold some depth. Select the fold shape and create a Linear gradient. Keep white as your first swatch, select 20% black as the second swatch and remove the border. When you adjust this gradient, start in the middle of the fold shape, hold Shift, and drag out to the bottom right of the fold at a 45 degree angle.
Now the fold is looking pretty good, but to give it a little more depth we can add a shadow to the fold. Select the fold shape, hold down the Alt/Option button and drag the shape slightly down and to the left. Copy (⌘c) the the sticker shape and Paste In Front (⌘f). Select the newly copied sticker shape and the copied fold shape and Intersect and Expand. Change the color of the fold shadow to 100% Cyan and 50% Magenta. Select the original fold shape and Bring It To The Front (⌘ Shift ]). Now you have a fancy Web 2.0 sticker!
Step 5: Expand
These stickers look great with icons or text on them, just experiment! Try adding different colors, shapes, or whatever. If you are to lazy or need some sticky icons quick, go check out some I created on iStock!



It’s really a great and useful piece of information. I am glad that you shared this helpful information with us. Please keep us informed like this. Thank you for sharing.
You should participate in a contest for among the finest blogs on the web. I will recommend this site!
Its like you read my mind! You appear to know a lot about this, like you wrote the book in it or something. I think that you can do with some pics to drive the message home a bit, but other than that, this is magnificent blog. A fantastic read. I’ll definitely be back.
You made several good points there. I did a search on the theme and found the majority of people will have the same opinion with your blog.
I have recently started a website, the information you offer on this website has helped me greatly. Thank you for all of your time & work.
Thanks so much for providing individuals with a very memorable opportunity to check tips from this site. It is often very brilliant and also full of fun for me personally and my office fellow workers to search your site at minimum three times weekly to study the newest stuff you have. And lastly, I’m also usually fascinated with all the brilliant strategies served by you. Selected 3 points in this article are undoubtedly the most impressive I’ve ever had.
What’s Happening i’m new to this, I stumbled upon this I have found It positively useful and it has aided me out loads. I hope to contribute & aid other users like its helped me. Great job.
What’s Going down i’m new to this, I stumbled upon this I’ve discovered It positively useful and it has aided me out loads. I hope to give a contribution & aid other customers like its aided me. Great job.
Thanks for any other magnificent article. The place else may just anyone get that type of information in such a perfect means of writing? I have a presentation next week, and I’m on the look for such information.
I would like to express thanks to you for rescuing me from this particular problem. Just after surfing through the search engines and coming across thoughts that were not beneficial, I assumed my entire life was done. Being alive without the presence of solutions to the issues you’ve fixed through the posting is a serious case, and those which may have in a negative way affected my entire career if I hadn’t discovered your blog. Your own personal understanding and kindness in touching all the details was vital. I am not sure what I would have done if I had not discovered such a solution like this. I am able to now relish my future. Thank you very much for the skilled and result oriented help. I won’t hesitate to refer the blog to any person who needs direction on this problem.
I love your blog.. very nice colors & theme. Did you create this website yourself or did you hire someone to do it for you? Plz answer back as I’m looking to create my own blog and would like to know where u got this from. appreciate it
It is really a great and useful piece of info. I am satisfied that you shared this helpful info with us. Please keep us informed like this. Thanks for sharing.
Hi! Would you mind if I share your blog with my facebook group? There’s a lot of folks that I think would really appreciate your content. Please let me know. Cheers
thanks for tutorial, nice job
Great share.
We are LogoProDesign as a Custom Logo Designer, We checked your artwork collections. Those are amazed us. ..
Thanks you… Very helpful.
Article writing is also a excitement, if you be familiar with afterward you can write otherwise it is complicated
to write.
İts wery helpful tutorial. Good way to create your own icons.
Very Thank you! That was so well written!
I’m learning so much from your tutorials! Thank You!
Thank you. Good work
When you adjust this gradient, start in the middle of the fold shape,
hold Shift, and drag out to the bottom right of the fold at a 45 degree
angle.
while I still don\’t think \”Web 2.0\” means anything I still appreciate image tutorials like this.
Those are amazed us. Thanks for that type of good work collections.
[…] vectips.com hat ein schönes Tutorial erstellt, wie man die beliebten Web 2.0 “Sticker” als Vektor-Grafik in Illustrator erstellt. Viel Spass beim Nachmachen… […]
I tried to ignore it, but I couldn’t…it just got way too annoying, as if some leprachaun was slowly sawing away on my auditory nerves using dental floss coated in shards of glass. But I digress
wow, great web2.0 tutorial, looking for the same 🙂
Thanks for that type of good work collections.
We are LogoProDesign as a Custom Logo Designer, We checked your artwork collections. Those are amazed us. Thanks for that type of good work collections. We regularly checked your website for good artwork example.
Thanks
David Thomas
work collections. We regularly checked your website for good artwork example.
Thanks
David Thomas
evaluate Amtrak’s plans to termanate this long neglected route, and expand the high speed designation pass Mobile to Jacksonville.
Thank you! That was so well written! And nicely illustrated.
thanks
color are essential when I create glossy buttons and icons. In the Glossy Buttons and Web 2.0 Stickers tutorials, I
very good thanks admin
They look awesome, thank you.
was explained step by step all do really been a useful lesson
Thank you! That was so well written! And nicely illustrated.
color are essential when I create glossy buttons and icons. In the Glossy Buttons and Web 2.0 Stickers tutorials, I
thanks good four
color are essential when I create glossy buttons and icons. In the Glossy Buttons and Web 2.0 Stickers tutorials, I used Cyan because it was easy to enter a percentage
konteyner
See the full tutorial here.
Nice tutorials! But how do you the icon one? I mean the color effect…its like transparent or something. I wanted to do that one.
Thanks for the information.
Thanks,
(3cci.in)
Nicely Illustrated
Great tutorial.
Very neat and clean.
It’s simply beautiful. I love it. Superb!!
Thanks for this nice tutorial dude, love it awesome. And now I know!..
Yah am using cs4 …… the expand button appeared as u said but the same problem already exist … only the included part is appearing and no intersection happen
great tutorial, it will be a fitting graphic for a web 2.0 site
Thanks for this nice tutorial dude, love it awesome. And now I know.
Great information! I’ve been looking for something like this for a while now. Thanks!
Awesome !!!
Thanks a lot for sharing 🙂
I am a total newbie to illustrator and when i first created the sticker, i was like f*****k !
Thanks, I like it! I’ll use this in the future! 🙂
thanks friend
Great.Nice tutorial. I love 2.0
Currently i am following this tutorial, this site is helpful for vector artist, taking idea and exploring creativity thanks to the team of this site.
Nice tutorial now i am following this site
super great site
very cool, and not all that difficult. I just started a course in graphic design and I always enjoy good tutorials on creating graphics in illustrator. Thanks.
really nice share.
like it!
wonderful work i like it so mush and they are so easy to learn
Thanks very good.
thank u very much very nice tut.
wow!..thank you..great work and thanks for the tips. Keep them coming.
I am grateful to you for this great content.
thanks admin your article is very good
thank : )perfect
Hello,
nice and easy Workshop. Thanks!
Greetings from germany,
Kasi
Here I found something that’s very usefull and I’ve been searching for long time. This tutorial is really good..so please visit the website Vectips
Thanks, it is very good, I like it very much.
I hope that more revenue sharing, super nice.
really good job I’d like to congratulate…
thanks alot~ i read many tutorial on these but your’s the most easiest way to do it!! thanks
haha very nice going make some stickerrs
This is a very intuitive and helpful tut. Great work!!
I LOVE YOU WEB 2.0 LOVE ADOBE
thats was so kewllllllllllll… thanks for sharing it.
Crazyrahul84
| Designer | http://books.iexplorehere.com |
Thank you………………..thankyoou
neat tutoral mate 🙂 thanks
Nice tutorail
I found the web 2.0 stickers tutorial really useful, easy to understand and insightful. I’m still learning alot about illustrator and I have to say this is the ONLY time I’ve ever used the Pathfinder Palette! If I had to suggest anything, it would be maybe have a quick video tutorial also? Keep em’ coming!
nice one!
PH
Está muy bueno!!!!
Very nice tutorial. I actually didin’t know that much about Illustrator but i got pretty inspired with doing this tutorial. But I have to say, even though this tutorial isin’t that hard, If you make one thing wrong you could be forced to start over hehe. I actually had to visit other tutorials to realize how some of the things were done. But I’m a noob so that could explain my struggle 😛
Over all, as I said a very nice tutorial!
Thanks, Very helpfull 🙂
Nice tutorial think I might implement it. Check out my website-
http://www.palaceofgamez.com
Thank you very much. A very useful and well written tutorial.
Very nice tutorial. The other tutorials i have seen for this effect have been difficult to read and understand. Yours however is readable and followable.
Sweet resource. Stumbled.
Yeaaah, same.
Great tutorial ….. thanks, John
Great tutorial, ill be using this!
Those are pretty sweet to the beat. Keep up the coolness.
Wow man, I totally love your work!
ThanX!
Nice tut, thanx!
Wow, thats a really sleek way to do things.
This was very helpful…thx
Fantastic!
Very web 2.0.. love it!
Simon
Great howto! Very good work. Keep it going. Thanks!
good work buddy, thanks.
Great … now that I know how to do this … I will try to do the same in GIMP 😀
aww this is cute. I’ll have to make some for my blog. 🙂
Thank a lot, very helpfull and well explained, easy to do even when you’re not an expert !
Very nice, thank you.
I’m glad there working!
Hi, Great tutorials
I am struggling a bit trying to combine the two techniques
I would like to create a sticker with a background image covering the background like a texture but an image I already have and then apply a shimmer and it still look good. So far it’s a bit hit and miss!
The image is already vector so I guess it shouldn’t be too tricky but I’m stalling!
Any ideas?
I usually do this a couple of ways. One way, is to make the shimmer shape a transparent white, instead of a gradient. Another way (I do this for stock illustration) is make a separate shimmer shape for the texture.
Let me know if that makes sense.
Fab!! Got it working nicely now, just a matter of getting used to it! thanks again!
select 20% black as the second swatch and remove the border. When you adjust this gradient, start in the middle of the fold shape, hold Shift, and drag out to the bottom right of the fold at a 45 degree angle.
Hello mate!
I am a beginner with Illustrator and I want to tell you that these tutorials are helping me alot. The explanation is very clear and good enough for a beginner like me. Keep up the good work mate!
Jouwplek
I am the same and feel the same like you.
Thanks a lot. Very helpful.
sweet tutorial, and the results speak for themselves.
select 20% black as the second swatch and remove the border. When you adjust this gradient, start in the middle of the fold shape, hold Shift, and drag out to the bottom right of the fold at a 45 degree angle.