

In this tutorial we’re doing to depict a delicious combo and by that I mean a cup of hot coffee and a sweet frosted donut. We’ll be using some basic geometric shapes that allow us to achieve a simple yet trendy flat style. What is more, we’ll get to know some of the most useful tools of Adobe Illustrator that will help you to create any shape or form for your future designs and illustrations. Without further ado, let’s get started with our coffee and doughnut vector!
Tutorial Details
- Program: Adobe Illustrator CS6 – CC
- Difficulty: Intermediate
- Topics Covered: Pathfinder Panel, Align Panel, Move Tool, Offset Path, Shape Builder Tool, Pencil Tool
- Estimated Completion Time: 20 minutes
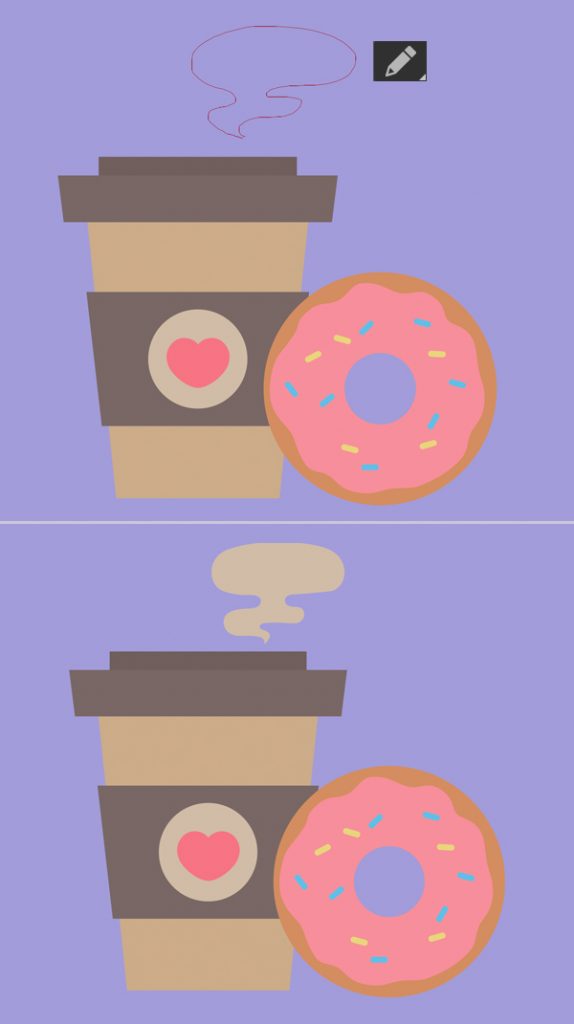
Final Image: Coffee and Donut Vector

Step 1
Most often, I start my work from a very rough sketch made in Adobe Illustrator with the help of the Pencil Tool (N). Remember to set the Fill color to None in the Color panel if you also want to scribble something as a base for your illustration.
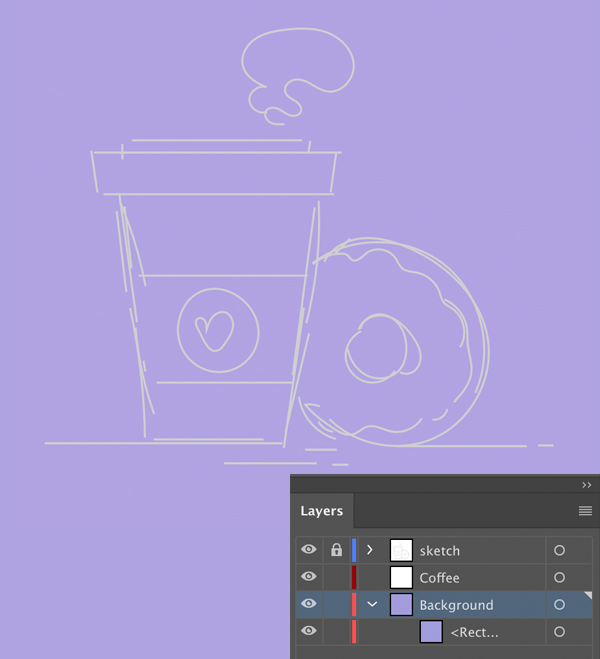
Here I’m using a 600 x 600 px purple shape made with the Rectangle Tool (M) as a background, covering the entire Artboard.
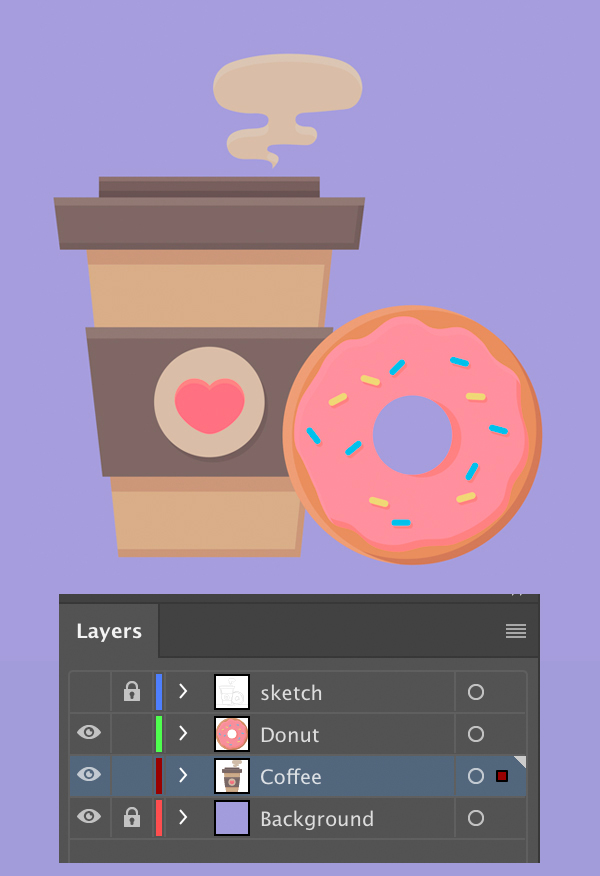
Another thing I prefer to do from the very beginning is to organise my Layers panel in a proper way so that everything is grouped and named nicely. This helps to keep all the objects neat and to locate things faster during the project.
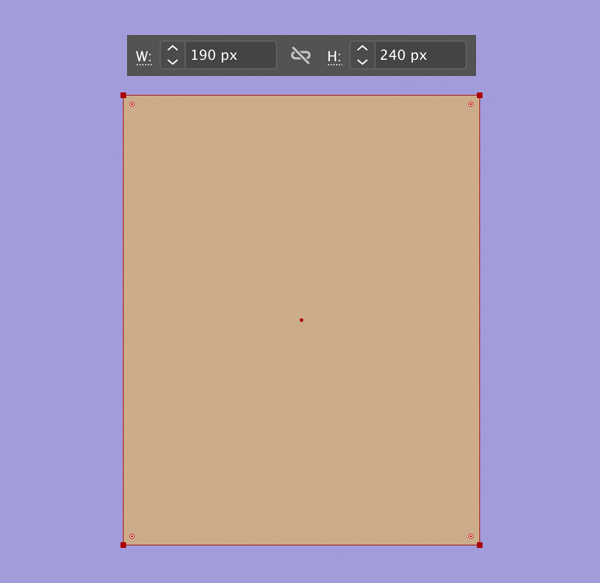
Step 2
Take the Rectangle Tool (M) and let’s start with the paper coffee cup. Make a 190 x 240 px light-brown shape.
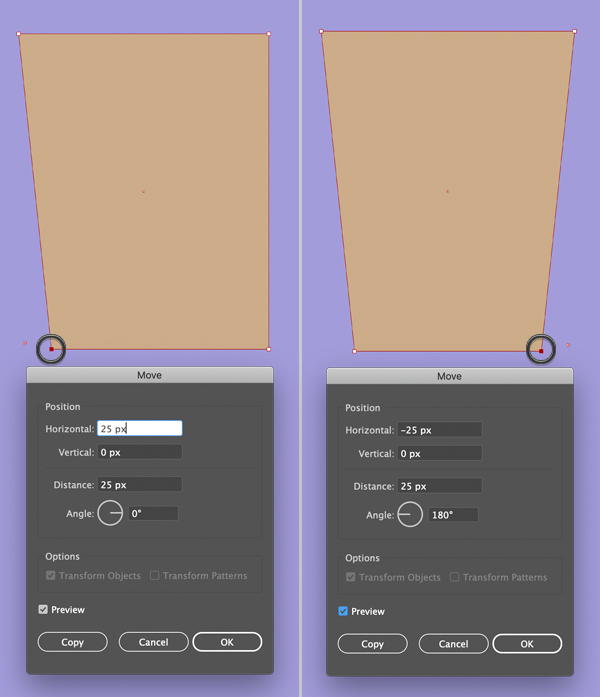
Step 3
Let’s make the bottom part of the cup narrower. Select the bottom left anchor point using the Direct Selection Tool (A) and press the Enter key of your keyboard. The Move window will pop up and from here set the Horizontal value to 25 px, Vertical to 0 px and click OK. Do the same for the opposite anchor point, but this time put a negative value to move it in the opposite direction.
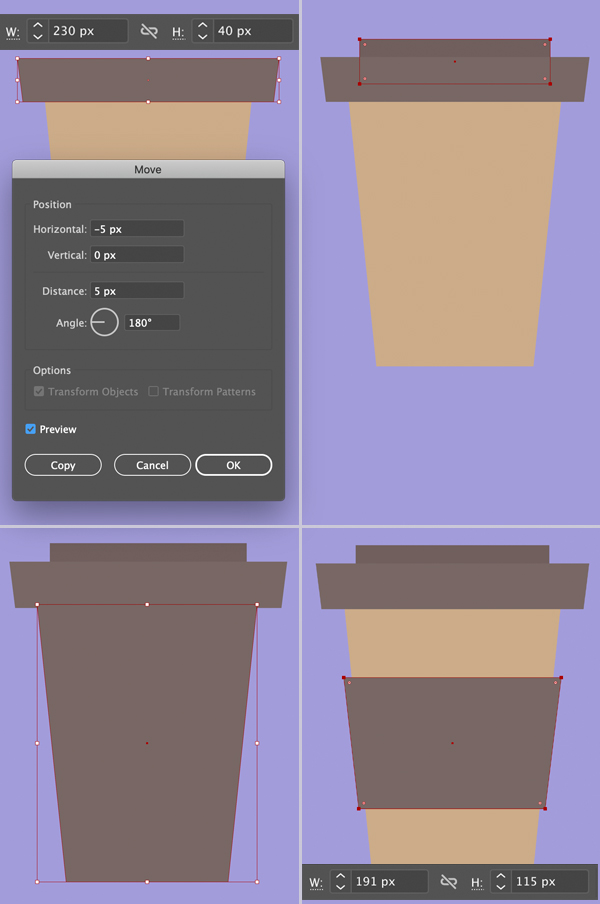
Step 4
Now we’ll make a lid to cover our cup. Draw a 230 x 40 px dark-brown rectangle and place it as shown below. Make sure that both shapes are aligned perfectly. We can check this by selecting both shapes and then clicking the cup shape once again so that the selection outline becomes thicker indicating that the cup is now the Key Object.
Open the Align panel (Window > Align), set the Align to Key Object and click Horizontal Align Center.
We can do the same from the control panel on top, if needed. We can also select everything and Align to Artboard, but in this case all the objects will be moved to the center of the canvas, which in some cases is not very convenient. Choose the option that works best for you.

Step 5
Let’s use the Move function again to move the top anchor points of the lid, making the shape a bit skewed.
Add a smaller rectangle on top, depicting the top part of the lid. Keeping the shape selected, press Control-Shift-[ to Send to Back.
Now let’s Duplicate (Control-C > Control-F) the base of the cup and fill it with the same dark-brown color as the lid. Squash the shape and place it across the center of the cup depicting a cardboard stripe that protects our hands when we’re holding a hot cup.
Step 6
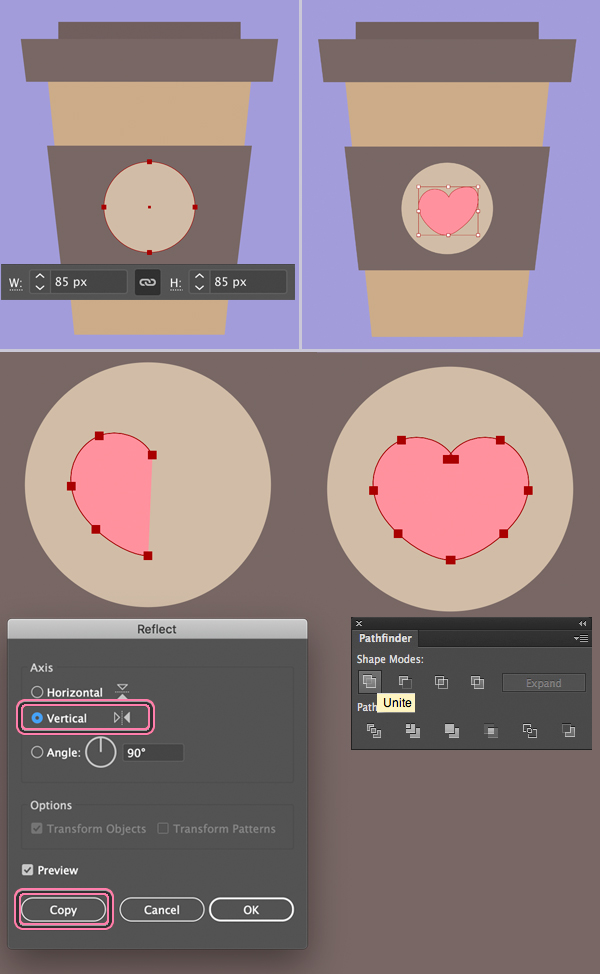
Let’s add some simple and cute design to the cardboard stripe. Use the Ellipse Tool (L) and hold Shift to make a 85 x 85 px circle.
Switch to the Pencil Tool (N) and draw a heart shape. It doesn’t have to be perfect though, as you can see, mine doesn’t look equal from both halves.
Let’s take the Direct Selection Tool (A) and select the anchor points on one side of the heart (choose the one that you like less as we’re going to delete it). Press Delete and now we have an open path with one half of the shape.
Keeping the shape selected with the Selection Tool (V), find the Reflect Tool (O) icon in the Tools panel and click it twice to open the Options menu. Set the Axis to Vertical and click Copy.
Move the created copy into place and merge both halves into one entire shape with the help of the Unite function of the Pathfinder panel.
Step 7
Now we have this cute cup of coffee for our coffee and doughnut vector.

Step 8
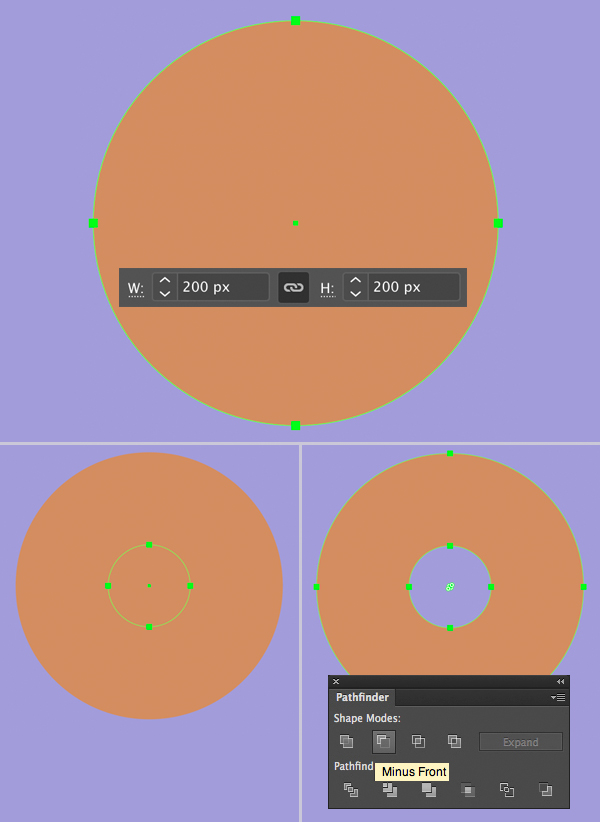
Let’s move on and draw a yummy donut! Take the Ellipse Tool (L) and start with a 200 x 200 px brown circle.
Make a smaller circle in the middle where the hole should be. Select both shapes and click Minus Front in the Pathfinder panel to cut the smaller circle out.
Step 9
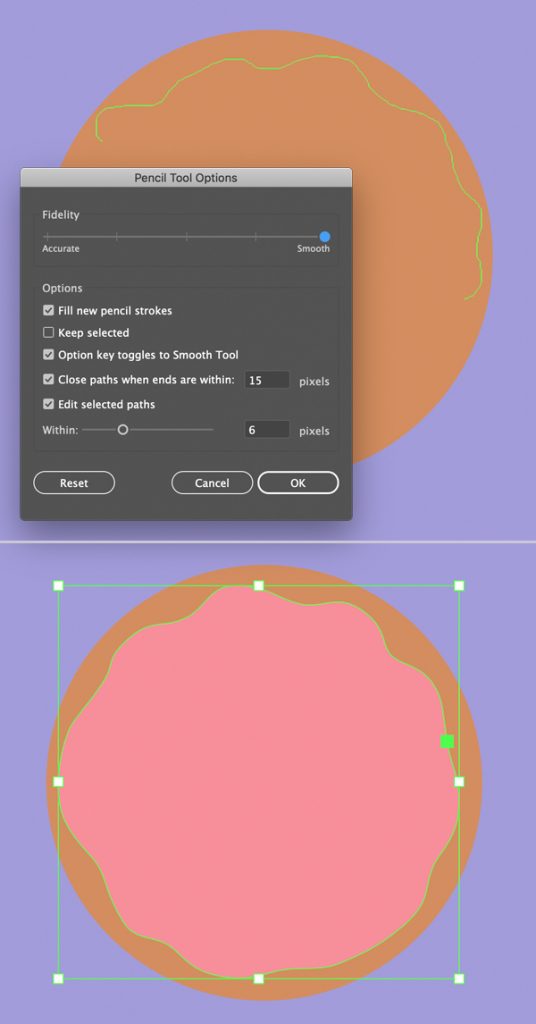
Take the Pencil Tool (N) and let’s add a frosted topping to our donut. We can double-click the Pencil Tool (N) icon in the Tools panel to open the Options and move the Fidelity-Smooth slider all the way to the right to make our lines clean and smooth.
Fill the created shape with bright pink color for the strawberry flavour.
Step 10
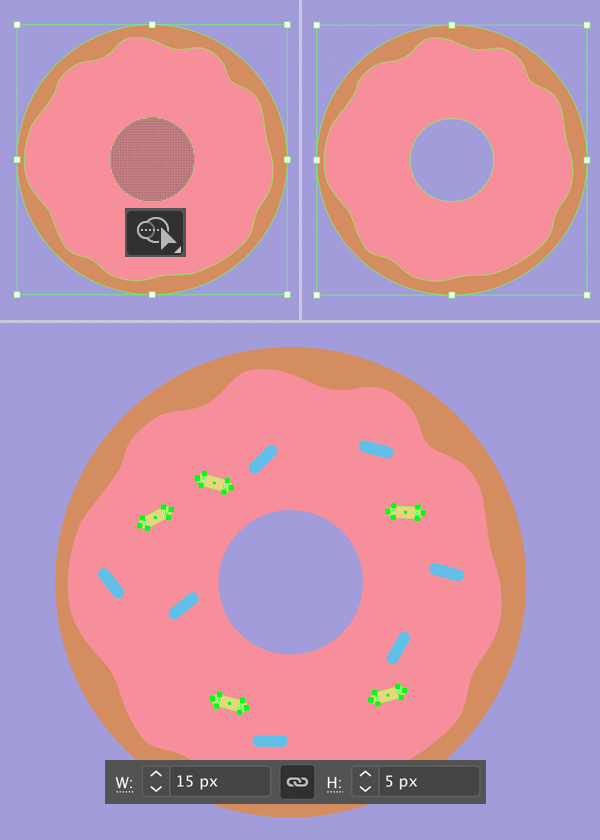
Let’s select both elements of the donut and cut the hole in the strawberry frosting. This time it will be a bit easier to make as we already have a hole in the donut itself. Simply take the Shape Builder Tool (Shift-M), hover the cursor over the center of the shape and click it while holding down Alt to delete the middle part.
Use the Rounded Rectangle Tool to sprinkle our donut.
Step 11
Now that we have this deliciously looking composition, let’s add some minor details to give it a more finished and balanced look to our coffee and doughnut vector.
First of all, use the Pencil Tool (N) and draw a tiny cloud of steam raising from out hot cup of coffee.
Step 12
Let’s make the objects in our coffee and doughnut vector a bit more dimensional by adding some super-simple shadows and highlights.
Select the wider element of the lid, Copy (Control-C) it and Paste in Front twice (Control-F > Control-F).
Select the top copy and move it down a bit by holding down Shift and pressing the down arrow key (I filled the top copy with a crazy green color just to make it better visible). Then select two copies and press Minus Front in the Pathfinder panel to erase the top shape. Now that we have a thin stripe, fill it with a lighter brown color, depicting a subtle highlight along the top edge of the lid.
Let’s repeat the same actions to create a shadow. Duplicate the element twice and this time move the top copy up and to the left a bit (I depicted it with a bright blue color in the image below). Select two copies and delete the unwanted parts with the Minus Front function. Fill the remaining shape with a darker brown color.
There we have it! Now the lid looks much more detailed and has some noticeable volume.
Use the same method to add highlights and shadows to other elements of the composition (the parts of the cup and the donut).

Step 13
This is how it looks all together with shadows and highlights. Our coffee and doughnut vector is coming to life.
Remember to organise the Layers – this will make your workflow more efficient.
Step 14
Let’s add a final touch to the compositions of the coffee and doughnut vector. At the moment our objects are just floating somewhere in space. We need to separate them from the background and put on some solid surface.
Start by selecting the Coffee layer in order to have all the elements of the coffee cup selected. Copy and Paste in Back (Control-C > Control-B) and click Unite in the Pathfinder panel to merge the pieces of the copy together. Now we have something like a silhouette copy of the cup.
Keeping it selected, go to Object > Path > Offset Path and set the Offset value to 5 px, creating a nice outline around the cup.
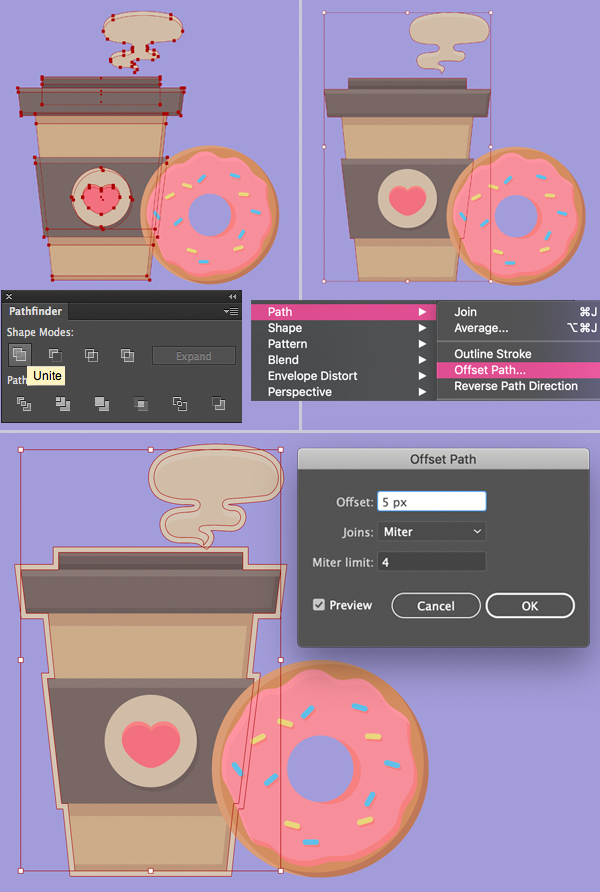
Step 15
Create the same outline for the donut and adjust the color of the outlines to make it match the background better.
Use the Rounded Rectangle Tool to create a narrow stripe for the surface under the objects.

Yum! Our Coffee and Donut Vector is Ready!
Great work guys! We can add a few more minor details to the ground and to the background, I’ve also adjusted the colors of the cup and the donut frosting making the set look finished and balanced. Voila!
I hope you’ve enjoyed following this coffee and doughnut vector tutorial and discovered something useful and new!
Have fun and remember to bring your own coffee cup with you for take-away coffee in order to reduce the quantity of single-use cups.
Choose to reuse and take care of the environment around you!
Author: Yulia Sokolova
2D/3D artist and tutorial instructor, focusing on character creation, icons, lettering design, and illustrations.


