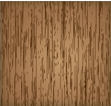
Last up for Vectip’s Texture Week is wood grain. The steps for this technique are very similar to the previous Brushed Metal Texture tutorial. It uses the same Graphic Pen effect but stretched a little more. It also uses the Warp Tool and Twirl Tool. Also like the other texture tutorials, this technique is easy and applicable in logos, icons, interfaces or pretty much anything.


 In the following tutorial you will learn how to create a detailed cylindrical loading bar vector in Adobe Illustrator. For starters you will learn how to setup a simple grid and how to create the stand using basic vector shape building techniques and some neat linear gradients. Using a complex linear gradient, blending techniques and some Drop Shadow effects you will learn how to create the cylinder. Moving on, taking full advantage of the Snap to Grid feature, you will learn how to create a pixel perfect text. Finally, you will learn learn some neat Stroke tricks and some basic masking techniques.
 Every smartphone has built in map software, and designers are sure to need GPS map vector icons. So, In this beginner/intermediate Illustrator tutorial, I will show you how to create a stylized GPS icon using simple shapes and gradients. Using these basic techniques, you can easily create other icons, logos, and illustrations.